


728x90
다양한 NodeGroup
- EKS Persistent Volumes for Instance Store
- 일반 EBS(기본값 3000IOPS) 보다 인스턴스 스토어 평균 IOPS 속도는 약 7배 빠름
- 인스턴스가(VM)이 물리노드의 스토리지를 사용
- 데이터 손실이 될 수 있음
- 기본 디스크 드라이브 오류, 인스턴스가 중지됨, 인스턴스가 최대 절전 모드로 전환됨, 인스턴스가 종료됨

# 인스턴스 스토어 볼륨이 있는 c5 모든 타입의 스토리지 크기
aws ec2 describe-instance-types \
 --filters "Name=instance-type,Values=c5*" "Name=instance-storage-supported,Values=true" \
 --query "InstanceTypes[].[InstanceType, InstanceStorageInfo.TotalSizeInGB]" \
 --output table
--------------------------
|  DescribeInstanceTypes |
+---------------+--------+
|  c5d.large    |  50    |
|  c5d.12xlarge |  1800  |
...

# myng2.yaml 파일 작성
cat << EOF > myng2.yaml
apiVersion: eksctl.io/v1alpha5
kind: ClusterConfig
metadata:
  name: myeks
  region: ap-northeast-2
  version: "1.31"

managedNodeGroups:
- amiFamily: AmazonLinux2
  desiredCapacity: 1
  instanceType: c5d.large
  labels:
    alpha.eksctl.io/cluster-name: myeks
    alpha.eksctl.io/nodegroup-name: ng2
    disk: instancestore
  maxPodsPerNode: 110
  maxSize: 1
  minSize: 1
  name: ng2
  ssh:
    allow: true
    publicKeyName: $SSHKEYNAME
  subnets:
  - $PubSubnet1
  - $PubSubnet2
  - $PubSubnet3
  tags:
    alpha.eksctl.io/nodegroup-name: ng2
    alpha.eksctl.io/nodegroup-type: managed
  volumeIOPS: 3000
  volumeSize: 30
  volumeThroughput: 125
  volumeType: gp3
  preBootstrapCommands:
    - |
      # Install Tools
      yum install nvme-cli links tree jq tcpdump sysstat -y

      # Filesystem & Mount
      mkfs -t xfs /dev/nvme1n1
      mkdir /data
      mount /dev/nvme1n1 /data

      # Get disk UUID
      uuid=\$(blkid -o value -s UUID mount /dev/nvme1n1 /data)

      # Mount the disk during a reboot
      echo /dev/nvme1n1 /data xfs defaults,noatime 0 2 >> /etc/fstab
EOF

# 신규 노드 그룹 생성
eksctl create nodegroup -f myng2.yaml

# 확인
kubectl get node --label-columns=node.kubernetes.io/instance-type,eks.amazonaws.com/capacityType,topology.kubernetes.io/zone
kubectl get node -l disk=instancestore


# ng2 노드 그룹 *ng2-remoteAccess* 포함된 보안그룹 ID
aws ec2 describe-security-groups --filters "Name=group-name,Values=*ng2-remoteAccess*" | jq
export NG2SGID=$(aws ec2 describe-security-groups --filters "Name=group-name,Values=*ng2-remoteAccess*" --query 'SecurityGroups[*].GroupId' --output text)
aws ec2 authorize-security-group-ingress --group-id $NG2SGID --protocol '-1' --cidr $(curl -s ipinfo.io/ip)/32
aws ec2 authorize-security-group-ingress --group-id $NG2SGID --protocol '-1' --cidr 172.20.1.100/32


# 워커 노드 SSH 접속
N4=<각자 자신의 워커 노드4번 공인 IP 지정>
ssh ec2-user@$N4 hostname

# 확인
ssh ec2-user@$N4 sudo nvme list
ssh ec2-user@$N4 sudo lsblk -e 7 -d
ssh ec2-user@$N4 sudo df -hT -t xfs
ssh ec2-user@$N4 sudo tree /data
ssh ec2-user@$N4 sudo cat /etc/fstab

# (옵션) max-pod 확인
kubectl describe node -l disk=instancestore | grep Allocatable: -A7

# (옵션) kubelet 데몬 파라미터 확인 : --max-pods=29 --max-pods=110
ssh ec2-user@$N4 cat /etc/eks/bootstrap.sh
ssh ec2-user@$N4 sudo ps -ef | grep kubelet
- local-path 스토리지 클래스 재생성 : 패스 변경
- instancestore 볼륨의 경우 AWS Console에서 확인 불가
- 성능 측정 시 기존 볼륨 IOPS보다 빠른것을 확인
# 기존 삭제
#curl -s -O https://raw.githubusercontent.com/rancher/local-path-provisioner/master/deploy/local-path-storage.yaml
cd
kubectl delete -f local-path-storage.yaml

#
sed -i 's/opt/data/g' local-path-storage.yaml
kubectl apply -f local-path-storage.yaml

# 모니터링
watch 'kubectl get pod -owide;echo;kubectl get pv,pvc'
ssh ec2-user@$N4 iostat -xmdz 1 -p nvme1n1

# 측정 : Read
#curl -s -O https://raw.githubusercontent.com/wikibook/kubepractice/main/ch10/fio-read.fio
kubestr fio -f fio-read.fio -s local-path --size 10G --nodeselector disk=nvme

 kubectl delete -f local-path-storage.yaml

# 노드그룹 삭제
eksctl delete nodegroup -c $CLUSTER_NAME -n ng2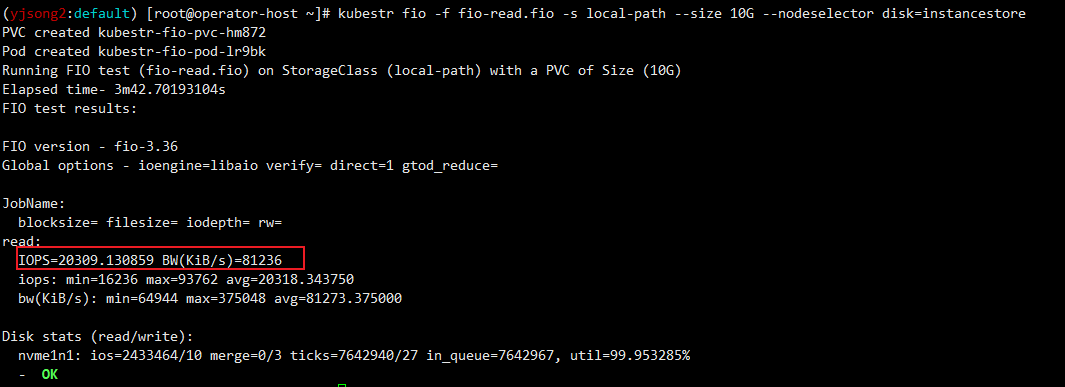
- 실습은 위한 사전 작업
- [운영서버 EC2] docker buildx 활성화 : Multi(or cross)-platform 빌드
#operator-host에서 실행
arch
x86_64

# CPU Arch arm64v8 , riscv64 실행 시도
docker run --rm -it riscv64/ubuntu bash
docker run --rm -it arm64v8/ubuntu bash


# Extended build capabilities with BuildKit - List builder instances
docker buildx ls
NAME/NODE DRIVER/ENDPOINT STATUS  BUILDKIT PLATFORMS
default * docker
  default default         running v0.12.5  linux/amd64, linux/amd64/v2, linux/amd64/v3, linux/386


# docker buildx 활성화 (멀티 아키텍처 빌드를 위해 필요)
docker run --rm --privileged multiarch/qemu-user-static --reset -p yes
docker images

docker buildx create --use --name mybuilder
docker buildx ls

# Buildx가 정상 동작하는지 확인
docker buildx inspect --bootstrap
...
Platforms: linux/amd64, linux/amd64/v2, linux/amd64/v3, linux/arm64, linux/riscv64, linux/ppc64, linux/ppc64le, linux/s390x, linux/386, linux/arm/v7, linux/arm/v6
...

docker buildx ls
NAME/NODE    DRIVER/ENDPOINT             STATUS  BUILDKIT PLATFORMS
mybuilder *  docker-container
  mybuilder0 unix:///var/run/docker.sock running v0.19.0  linux/amd64, linux/amd64/v2, linux/amd64/v3, linux/arm64, linux/riscv64, linux/ppc64, linux/ppc64le, linux/s390x, linux/386, linux/arm/v7, linux/arm/v6
default      docker
  default    default                     running v0.12.5  linux/amd64, linux/amd64/v2, linux/amd64/v3, linux/386, linux/arm64, linux/riscv64, linux/ppc64, linux/ppc64le, linux/s390x, linux/mips64le, linux/mips64, linux/arm/v7, linux/arm/v6

docker ps
CONTAINER ID   IMAGE                           COMMAND       CREATED              STATUS              PORTS     NAMES
fa8773b87c70   moby/buildkit:buildx-stable-1   "buildkitd"   About a minute ago   Up About a minute             buildx_buildkit_mybuilder0
- (샘플) 컨테이너 이미지 빌드 및 실행 - 윈도우PC(amd64)와 macOS(arm64)
#
mkdir myweb && cd myweb
# server.py 파일 작성
cat > server.py <<EOF
from http.server import ThreadingHTTPServer, BaseHTTPRequestHandler
from datetime import datetime
import socket
class RequestHandler(BaseHTTPRequestHandler):
def do_GET(self):
self.send_response(200)
self.send_header('Content-type', 'text/plain')
self.end_headers()
now = datetime.now()
hostname = socket.gethostname()
response_string = now.strftime("The time is %-I:%M:%S %p, VERSION 0.0.1\n")
response_string += f"Server hostname: {hostname}\n"
self.wfile.write(bytes(response_string, "utf-8"))
def startServer():
try:
server = ThreadingHTTPServer(('', 80), RequestHandler)
print("Listening on " + ":".join(map(str, server.server_address)))
server.serve_forever()
except KeyboardInterrupt:
server.shutdown()
if __name__ == "__main__":
startServer()
EOF
# Dockerfile 생성
cat > Dockerfile <<EOF
FROM python:3.12
ENV PYTHONUNBUFFERED 1
COPY . /app
WORKDIR /app
CMD python3 server.py
EOF
# 빌드, 실행 후 삭제
docker pull python:3.12
docker build -t myweb:1 -t myweb:latest .
docker images
docker run -d -p 8080:80 --name=timeserver myweb
curl http://localhost:8080
docker rm -f timeserver
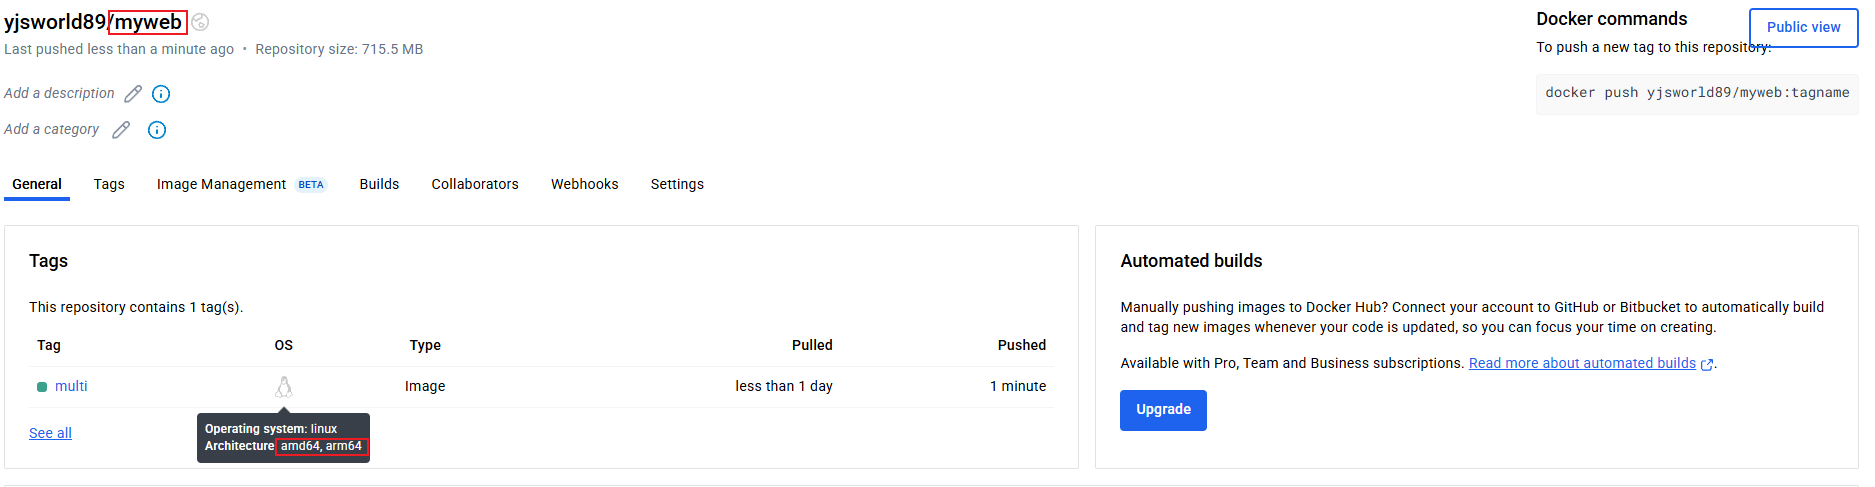
# 멀티 플랫폼 빌드 후 푸시
docker images
docker login
DOCKERNAME=<도커허브 계정명>
DOCKERNAME=gasida
docker buildx build --platform linux/amd64,linux/arm64 --push --tag $DOCKERNAME/myweb:multi .
docker images
docker manifest inspect $DOCKERNAME/myweb:multi | jq
docker buildx imagetools inspect $DOCKERNAME/myweb:multi
# 컨테이너 실행 해보기 : 윈도우PC(amd64)와 macOS(arm64) 두 곳 모두 동일한 컨테이너 이미지 경로로 실행해보자!
docker ps
docker run -d -p 8080:80 --name=timeserver $DOCKERNAME/myweb:multi
docker ps
# 컨테이너 접속 및 로그 확인
curl http://localhost:8080
docker logs timeserver
# 컨테이너 이미지 내부에 파일 확인
docker exec -it timeserver ls -l
# 컨테이너 이미지 내부에 server.py 파일 확인
docker exec -it timeserver cat server.py
# 컨테이너 삭제
docker rm -f timeserver
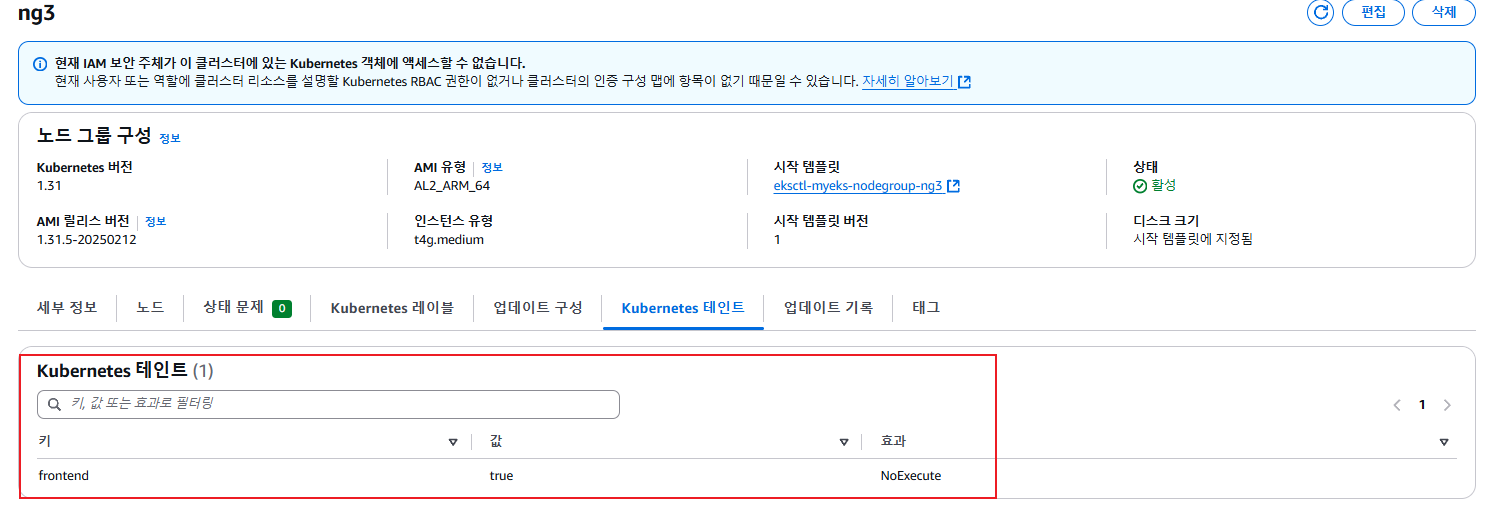
- Graviton (ARM) Instance 노드그룹
- AWS Graviton 프로세서 : 64-bit Arm 프로세서 코어 기반의 AWS 커스텀 반도체 ⇒ 20~40% 향상된 가격대비 성능


#
kubectl get nodes -L kubernetes.io/arch

# 신규 노드 그룹 생성
eksctl create nodegroup --help
eksctl create nodegroup -c $CLUSTER_NAME -r ap-northeast-2 --subnet-ids "$PubSubnet1","$PubSubnet2","$PubSubnet3" \
  -n ng3 -t t4g.medium -N 1 -m 1 -M 1 --node-volume-size=30 --node-labels family=graviton --dry-run > myng3.yaml
cat myng3.yaml
eksctl create nodegroup -f myng3.yaml

# 확인
kubectl get nodes --label-columns eks.amazonaws.com/nodegroup,kubernetes.io/arch,eks.amazonaws.com/capacityType
kubectl describe nodes --selector family=graviton
aws eks describe-nodegroup --cluster-name $CLUSTER_NAME --nodegroup-name ng3 | jq .nodegroup.taints

# taints 셋팅 -> 적용에 2~3분 정도 시간 소요
aws eks update-nodegroup-config --cluster-name $CLUSTER_NAME --nodegroup-name ng3 --taints "addOrUpdateTaints=[{key=frontend, value=true, effect=NO_EXECUTE}]"

# 확인
kubectl describe nodes --selector family=graviton | grep Taints
aws eks describe-nodegroup --cluster-name $CLUSTER_NAME --nodegroup-name ng3 | jq .nodegroup.taints
# NO_SCHEDULE - This corresponds to the Kubernetes NoSchedule taint effect. This configures the managed node group with a taint that repels all pods that don't have a matching toleration. All running pods are not evicted from the manage node group's nodes.
# NO_EXECUTE - This corresponds to the Kubernetes NoExecute taint effect. Allows nodes configured with this taint to not only repel newly scheduled pods but also evicts any running pods without a matching toleration.
# PREFER_NO_SCHEDULE - This corresponds to the Kubernetes PreferNoSchedule taint effect. If possible, EKS avoids scheduling Pods that do not tolerate this taint onto the node.

- 실습용 busybox 컨테이너 생성
#
cat <<EOF | kubectl apply -f -
apiVersion: v1
kind: Pod
metadata:
  name: busybox
spec:
  terminationGracePeriodSeconds: 3
  containers:
  - name: busybox
    image: busybox
    command:
    - "/bin/sh"
    - "-c"
    - "while true; do date >> /home/pod-out.txt; cd /home; sync; sync; sleep 10; done"
  tolerations:
    - effect: NoExecute
      key: frontend
      operator: Exists
  nodeSelector:
    family: graviton
EOF

# 파드가 배포된 노드 정보 확인
kubectl get pod -owide
kubectl describe pod busybox
kubectl exec -it busybox -- arch
kubectl exec -it busybox -- tail -f /home/pod-out.txt

# 삭제
kubectl delete pod busybox
- graviton pod 생성
#
cat <<EOF | kubectl apply -f -
apiVersion: v1
kind: Pod
metadata:
  name: busybox
spec:
  terminationGracePeriodSeconds: 3
  containers:
  - name: busybox
    image: busybox
    command:
    - "/bin/sh"
    - "-c"
    - "while true; do date >> /home/pod-out.txt; cd /home; sync; sync; sleep 10; done"
  tolerations:
    - effect: NoExecute
      key: frontend
      operator: Exists
  nodeSelector:
    family: graviton
EOF

# 파드가 배포된 노드 정보 확인
kubectl get pod -owide
kubectl describe pod busybox
kubectl exec -it busybox -- arch
kubectl exec -it busybox -- tail -f /home/pod-out.txt

# 삭제
kubectl delete pod busybox
- 운영서버 EC2 에서 빌드한 myweb 컨테이너 이미지를 파드로 배포해보기
# 아래 gasida 부분은 자신의 도커 허브 계정명으로 변경하거나 혹은 AWS ECR 프라이빗 저장소 경로로 변경해서 배포해보자
cat <<EOF | kubectl apply -f -
apiVersion: v1
kind: Pod
metadata:
  name: myweb-arm
spec:
  terminationGracePeriodSeconds: 3
  containers:
  - name: myweb
    image: gasida/myweb:multi
  tolerations:
    - effect: NoExecute
      key: frontend
      operator: Exists
  nodeSelector:
    family: graviton
---
apiVersion: v1
kind: Pod
metadata:
  name: myweb-amd
spec:
  terminationGracePeriodSeconds: 3
  containers:
  - name: myweb
    image: gasida/myweb:multi
EOF

#
kubectl get pod -owide
kubectl exec -it myweb-arm -- arch
kubectl exec -it myweb-amd -- arch

kubectl exec -it myweb-arm -- curl localhost
kubectl exec -it myweb-amd -- curl localhost

# 삭제
kubectl delete pod myweb-arm myweb-amd
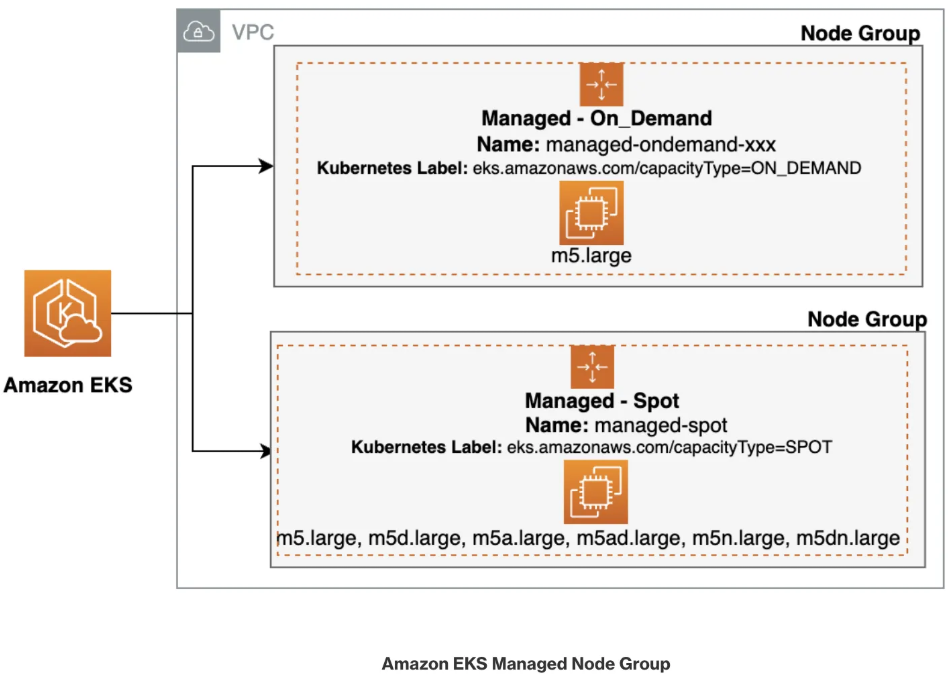
- Spot instances 노드 그룹 (managed-spot)
- AWS 고객이 EC2 여유 용량 풀을 활용하여 엄청난 할인으로 EC2 인스턴스를 실행할 수 있음
- EC2에 용량이 다시 필요할 때 2분 알림으로 Spot Instances를 중단할 수 있습니다.
- Kubernetes 워커 노드로 Spot Instances를 사용하는 것은 상태 비저장 API 엔드포인트, 일괄 처리, ML 학습 워크로드, Apache Spark를 사용한 빅데이터 ETL, 대기열 처리 애플리케이션, CI/CD 파이프라인과 같은 워크로드에 매우 인기 있는 사용 패턴
- Kubernetes에서 상태 비저장 API 서비스를 실행하는 것은 Spot Instances를 워커 노드로 사용하기에 매우 적합
- Pod를 우아하게 종료할 수 있고 Spot Instances가 중단되면 다른 워커 노드에서 대체 Pod를 예약할 수 있기 때문
# [운영서버 EC2] ec2-instance-selector 설치
curl -Lo ec2-instance-selector https://github.com/aws/amazon-ec2-instance-selector/releases/download/v2.4.1/ec2-instance-selector-`uname | tr '[:upper:]' '[:lower:]'`-amd64 && chmod +x ec2-instance-selector
mv ec2-instance-selector /usr/local/bin/
ec2-instance-selector --version

# 적절한 인스턴스 스펙 선택을 위한 도구 사용
ec2-instance-selector --vcpus 2 --memory 4 --gpus 0 --current-generation -a x86_64 --deny-list 't.*' --output table-wide
Instance Type   VCPUs   Mem (GiB)  Hypervisor  Current Gen  Hibernation Support  CPU Arch  Network Performance  ENIs    GPUs    GPU Mem (GiB)  GPU Info  On-Demand Price/Hr  Spot Price/Hr (30d avg)
-------------   -----   ---------  ----------  -----------  -------------------  --------  -------------------  ----    ----    -------------  --------  ------------------  -----------------------
c5.large        2       4          nitro       true         true                 x86_64    Up to 10 Gigabit     3       0       0              none      $0.096              $0.02837
c5a.large       2       4          nitro       true         false                x86_64    Up to 10 Gigabit     3       0       0              none      $0.086              $0.04022
c5d.large       2       4          nitro       true         true                 x86_64    Up to 10 Gigabit     3       0       0              none      $0.11               $0.03265
c6i.large       2       4          nitro       true         true                 x86_64    Up to 12.5 Gigabit   3       0       0              none      $0.096              $0.03425
c6id.large      2       4          nitro       true         true                 x86_64    Up to 12.5 Gigabit   3       0       0              none      $0.1155             $0.03172
c6in.large      2       4          nitro       true         true                 x86_64    Up to 25 Gigabit     3       0       0              none      $0.1281             $0.04267
c7i-flex.large  2       4          nitro       true         true                 x86_64    Up to 12.5 Gigabit   3       0       0              none      $0.09576            $0.02872
c7i.large       2       4          nitro       true         true                 x86_64    Up to 12.5 Gigabit   3       0       0              none      $0.1008             $0.02977

#Internally ec2-instance-selector is making calls to the DescribeInstanceTypes for the specific region and filtering the instances based on the criteria selected in the command line, in our case we filtered for instances that meet the following criteria:
- Instances with no GPUs
- of x86_64 Architecture (no ARM instances like A1 or m6g instances for example)
- Instances that have 2 vCPUs and 4 GB of RAM
- Instances of current generation (4th gen onwards)
- Instances that don’t meet the regular expression t.* to filter out burstable instance types

- Pod배포 실습
#
cat <<EOF | kubectl apply -f -
apiVersion: v1
kind: Pod
metadata:
  name: busybox
spec:
  terminationGracePeriodSeconds: 3
  containers:
  - name: busybox
    image: busybox
    command:
    - "/bin/sh"
    - "-c"
    - "while true; do date >> /home/pod-out.txt; cd /home; sync; sync; sleep 10; done"
  nodeSelector:
    eks.amazonaws.com/capacityType: SPOT
EOF

# 파드가 배포된 노드 정보 확인
kubectl get pod -owide

# 삭제
kubectl delete pod busybox
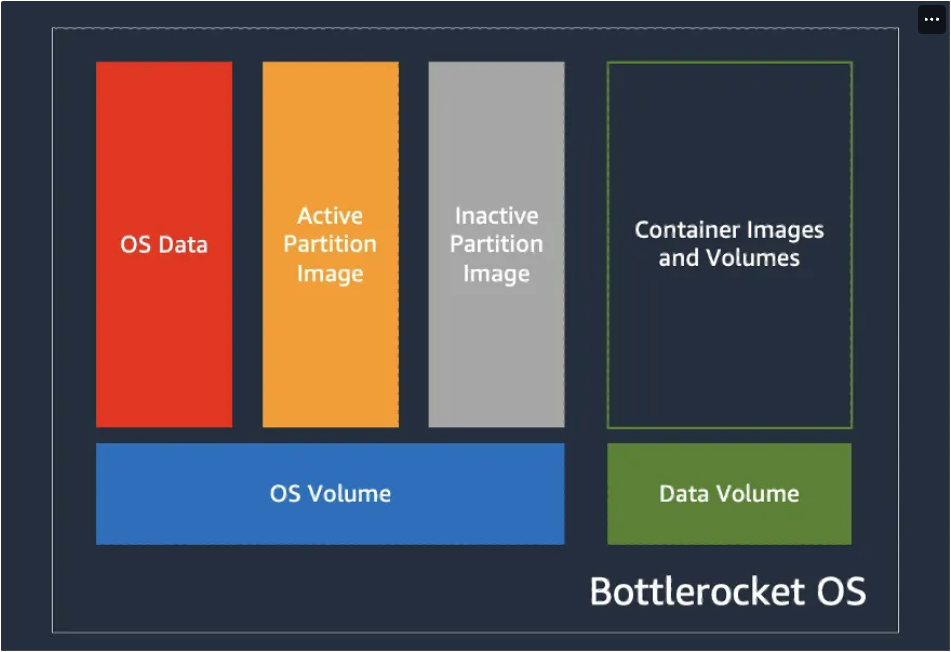
- Bottlerocket AMI( 컨테이너 실행을 위한 Linux 기반 운영 체제)
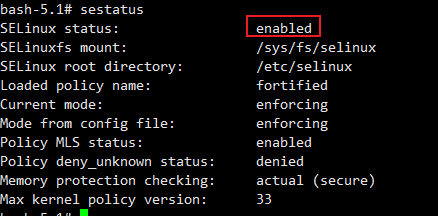
- Bottlerocket은 보안에 중점을 두고, 컨테이너 호스팅에 필수적인 소프트웨어만 포함 → SELinux
- 노드그룹 생성
cat << EOF > ng-br.yaml
apiVersion: eksctl.io/v1alpha5
kind: ClusterConfig
metadata:
  name: myeks
  region: ap-northeast-2
  version: "1.31"

managedNodeGroups:
- name: ng-bottlerocket
  instanceType: m5.large
  amiFamily: Bottlerocket
  bottlerocket:
    enableAdminContainer: true
    settings:
      motd: "Hello, eksctl!"
  desiredCapacity: 1
  maxSize: 1
  minSize: 1
  labels:
    alpha.eksctl.io/cluster-name: myeks
    alpha.eksctl.io/nodegroup-name: ng-bottlerocket
    ami: bottlerocket
  subnets:
  - $PubSubnet1
  - $PubSubnet2
  - $PubSubnet3
  tags:
    alpha.eksctl.io/nodegroup-name: ng-bottlerocket
    alpha.eksctl.io/nodegroup-type: managed

- name: ng-bottlerocket-ssh
  instanceType: m5.large
  amiFamily: Bottlerocket
  desiredCapacity: 1
  maxSize: 1
  minSize: 1
  ssh:
    allow: true
    publicKeyName: $SSHKEYNAME
  labels:
    alpha.eksctl.io/cluster-name: myeks
    alpha.eksctl.io/nodegroup-name: ng-bottlerocket-ssh
    ami: bottlerocket
  subnets:
  - $PubSubnet1
  - $PubSubnet2
  - $PubSubnet3
  tags:
    alpha.eksctl.io/nodegroup-name: ng-bottlerocket-ssh
    alpha.eksctl.io/nodegroup-type: managed
EOF

cat ng-br.yaml
eksctl create nodegroup -f ng-br.yaml
- 확인
# 노드의 OS 와 CRI 정보 등 확인
kubectl get node --label-columns=alpha.eksctl.io/nodegroup-name,ami,node.kubernetes.io/instance-type
kubectl get node -owide
# 인스턴스 IP 확인
aws ec2 describe-instances --query "Reservations[*].Instances[*].{InstanceID:InstanceId, PublicIPAdd:PublicIpAddress, PrivateIPAdd:PrivateIpAddress, InstanceName:Tags[?Key=='Name']|[0].Value, Status:State.Name}" --filters Name=instance-state-name,Values=running --output table

#SSH설정이 없는 bottlerocket노드에는 접근 불가
BRNode1=<ng-bottlerocket EC2 유동공인 IP>
BRNode2=<ng-bottlerocket-ssh EC2 유동공인 IP>
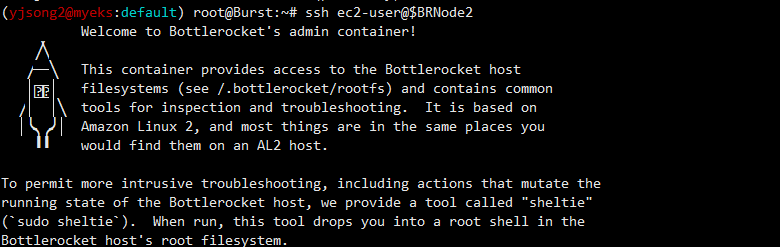
ssh $BRNode2
-----------------
# AL2 기반이여, 문제 해결을 위한 도구 포함.
# sudo sheltie 실행 시 you into a root shell in the Bottlerocket host's root filesystem.
whoami
pwd
ip -c a
lsblk
sudo yum install htop which -y
htop
which bash
which sh
ps
ps -ef
ps 1
sestatus
getenforce

**sudo sheltie**
whoami
pwd
ip -c a
lsblk
yum install jq -y
ps
ps -ef
ps 1
sestatus
getenforce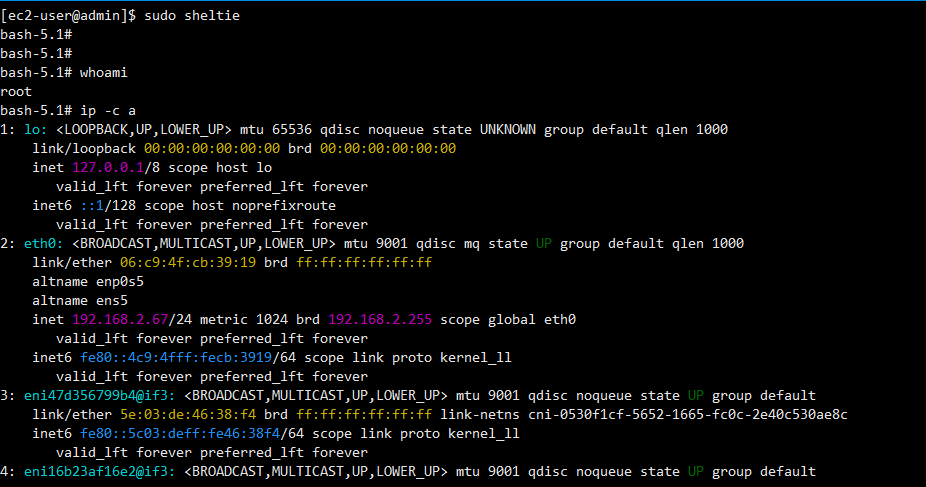
- SSH접근이 불가한 Node 접근
- WSL의 경우, AWS Console Session Manager를 통해 접근
# ng-bottlerocket 인스턴스 ID 필터링
aws ec2 describe-instances --filters "Name=tag:eks:nodegroup-name,Values=ng-bottlerocket" | jq -r '.[][0]["Instances"][0]["InstanceId"]'
# Run the below command to create an SSM session with bottlerocket node
aws ssm start-session --target $(aws ec2 describe-instances --filters "Name=tag:eks:nodegroup-name,Values=ng-bottlerocket" | jq -r '.[][0]["Instances"][0]["InstanceId"]')
-----------------
# Bottlerocket의 Control Container 진입
# 이 컨테이너는 Bottlerocket API에 접근할 수 있도록 해주며, 이를 통해 시스템을 점검하고 설정을 변경할 수 있음.
# 이를 위해 apiclient 도구를 사용하는 것이 일반적입니다. 예) 시스템 점검 apiclient -u /settings | jq
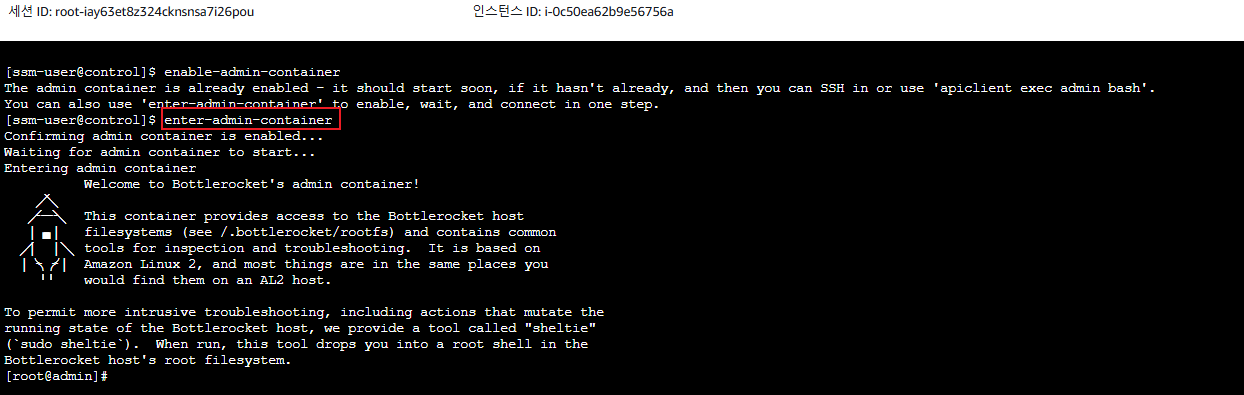
# 고급 디버깅을 위해서는 Admin Container를 사용 : 호스트에 대한 root 접근을 허용
# Admin Container를 활성화한 후, SSH로 접근 가능.
# apiclient 사용
apiclient --help
apiclient -u /settings | jq
apiclient get | jq
apiclient get | grep motd
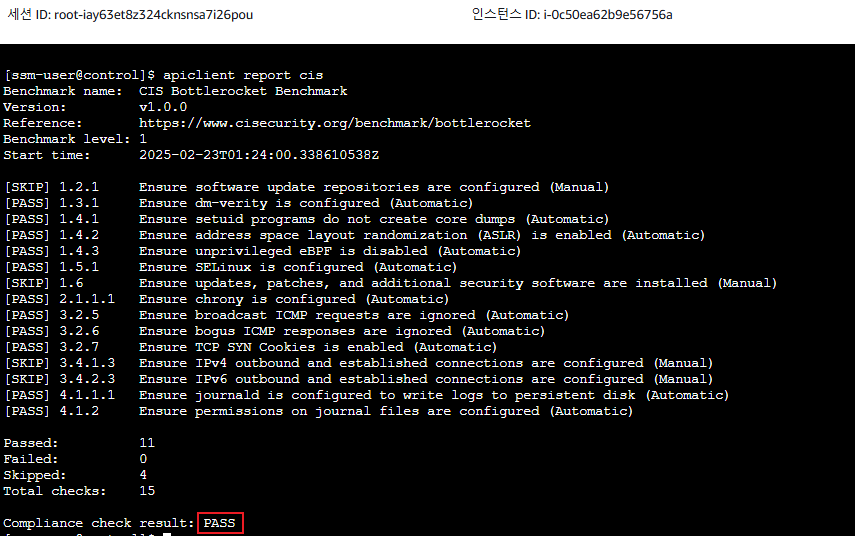
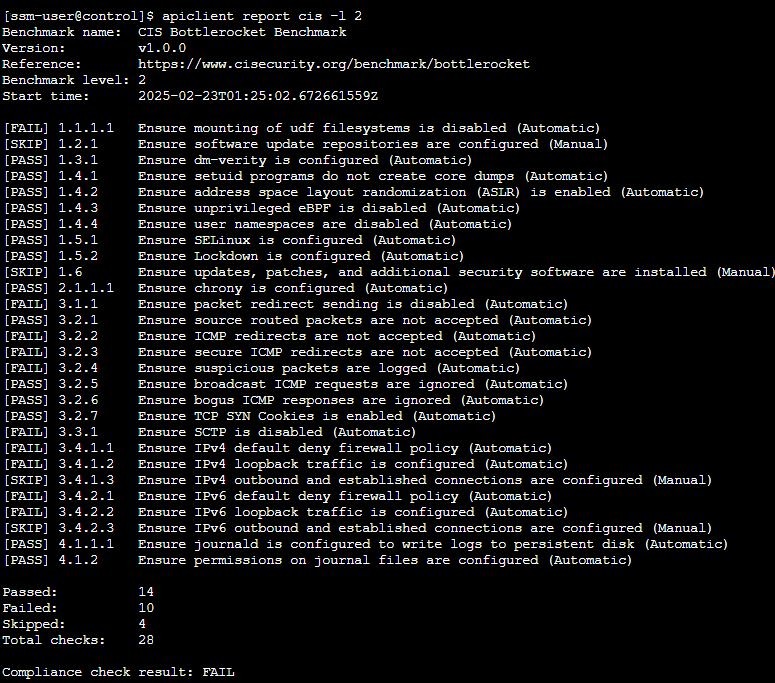
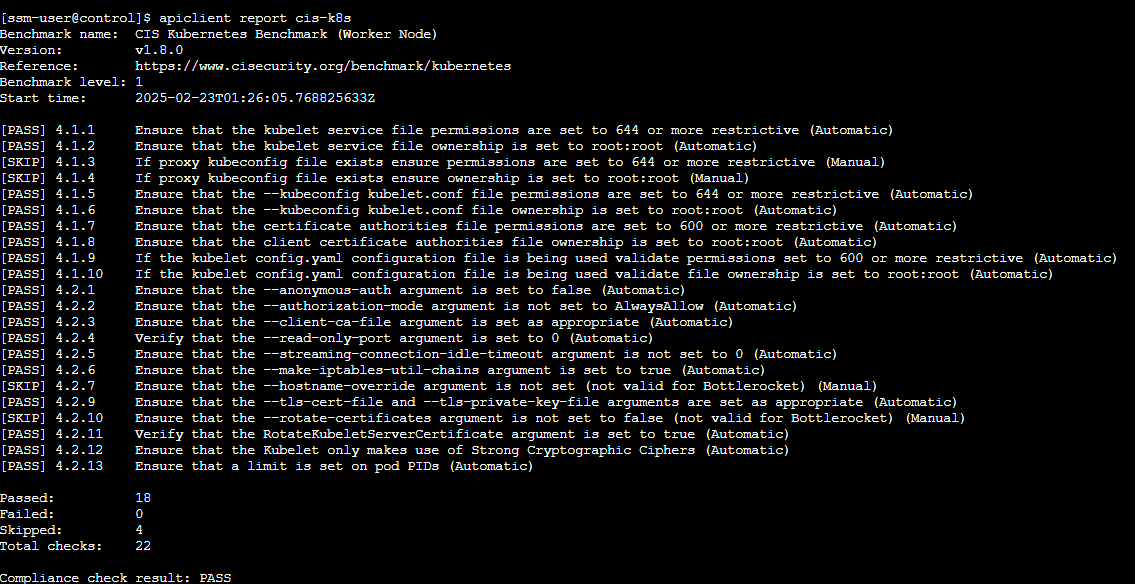
# CIS benchmark for Bottlerocket
apiclient report cis
- CIS밴치마크 확인
- enter-admin-container
- OS업데이트
# checks to see whether there is a new version of the installed variant
apiclient update check | jq

# downloads the update and verifies that it has been staged
apiclient update apply

# activates the update and reboots the system
apiclient reboot
- 파드배포 실습
#
cat <<EOF | kubectl apply -f -
apiVersion: v1
kind: Pod
metadata:
  name: busybox
spec:
  terminationGracePeriodSeconds: 3
  containers:
  - name: busybox
    image: busybox
    command:
    - "/bin/sh"
    - "-c"
    - "while true; do date >> /home/pod-out.txt; cd /home; sync; sync; sleep 10; done"
  nodeSelector:
    ami: bottlerocket
EOF

# 파드가 배포된 노드 정보 확인
kubectl get pod -owide

#
kubectl exec -it busybox -- tail -f /home/pod-out.txt

# 삭제
728x90
'2025_AEWS Study' 카테고리의 다른 글
| 4주차 - EKS Observability(2) Metrics-server, Prometheus (0) | 2025.03.01 |
|---|---|
| 4주차 - EKS Observability(1) Logging (0) | 2025.03.01 |
| 3주차 - EKS Storage & Managed Node Groups(3)(AWS EBS, EFS Controller) (0) | 2025.02.19 |
| 3주차 - EKS Storage & Managed Node Groups(2)(Kubestr 모니터링 및 성능 측정 확인) (0) | 2025.02.19 |
| 3주차 - EKS Storage & Managed Node Groups(1)(스토리지) (0) | 2025.02.19 |