

728x90
AWS EBS Controller
- AWS CSI 드라이버는 크게 2개 구성요소로 이루어져 있음
- AWS API를 호출하면서 AWS 스토리지를 관리하는 CSI-Controller
- kubelet과 상호작용하면서 AWS스토리지를 pod에 마운트하는 CSI-Node

- EBS Controller 설치
# 아래는 aws-ebs-csi-driver 전체 버전 정보와 기본 설치 버전(True) 정보 확인
aws eks describe-addon-versions \
    --addon-name aws-ebs-csi-driver \
    --kubernetes-version 1.31 \
    --query "addons[].addonVersions[].[addonVersion, compatibilities[].defaultVersion]" \
    --output text

# ISRA 설정 : AWS관리형 정책 AmazonEBSCSIDriverPolicy 사용
eksctl create iamserviceaccount \
  --name ebs-csi-controller-sa \
  --namespace kube-system \
  --cluster ${CLUSTER_NAME} \
  --attach-policy-arn arn:aws:iam::aws:policy/service-role/AmazonEBSCSIDriverPolicy \
  --approve \
  --role-only \
  --role-name AmazonEKS_EBS_CSI_DriverRole

# ISRA 확인
eksctl get iamserviceaccount --cluster ${CLUSTER_NAME}

# Amazon EBS CSI driver addon 배포(설치)
export ACCOUNT_ID=$(aws sts get-caller-identity --query 'Account' --output text)
eksctl create addon --name aws-ebs-csi-driver --cluster ${CLUSTER_NAME} --service-account-role-arn arn:aws:iam::${ACCOUNT_ID}:role/AmazonEKS_EBS_CSI_DriverRole --force
kubectl get sa -n kube-system ebs-csi-controller-sa -o yaml | head -5

# 확인
eksctl get addon --cluster ${CLUSTER_NAME}
kubectl get deploy,ds -l=app.kubernetes.io/name=aws-ebs-csi-driver -n kube-system
kubectl get pod -n kube-system -l 'app in (ebs-csi-controller,ebs-csi-node)'
kubectl get pod -n kube-system -l app.kubernetes.io/component=csi-driver

# ebs-csi-controller 파드에 6개 컨테이너 확인
kubectl get pod -n kube-system -l app=ebs-csi-controller -o jsonpath='{.items[0].spec.containers[*].name}' ; echo
ebs-plugin csi-provisioner csi-attacher csi-snapshotter csi-resizer liveness-probe

# csinodes 확인
kubectl api-resources | grep -i csi
kubectl get csinodes
kubectl describe csinodes

kubectl get csidrivers
kubectl describe csidrivers ebs.csi.aws.com


# (참고) 노드에 최대 EBS 부착 수량 변경
aws eks update-addon --cluster-name ${CLUSTER_NAME} --addon-name aws-ebs-csi-driver \
  --addon-version v1.39.0-eksbuild.1 --configuration-values '{
    "node": {
      "volumeAttachLimit": 31,
      "enableMetrics": true
    }
  }'
혹은
cat << EOF > node-attachments.yaml
"node":
  "volumeAttachLimit": 31
  "enableMetrics": true
EOF
aws eks update-addon --cluster-name ${CLUSTER_NAME} --addon-name aws-ebs-csi-driver \
  --addon-version v1.39.0-eksbuild.1 --configuration-values 'file://node-attachments.yaml'


## 확인
kubectl get ds -n kube-system ebs-csi-node -o yaml
- gp3 스토리지 클래스 생성
# gp3 스토리지 클래스 생성
kubectl get sc
cat <<EOF | kubectl apply -f -
kind: StorageClass
apiVersion: storage.k8s.io/v1
metadata:
  name: gp3
  annotations:
    storageclass.kubernetes.io/is-default-class: "true"
allowVolumeExpansion: true
provisioner: ebs.csi.aws.com
volumeBindingMode: WaitForFirstConsumer
parameters:
  type: gp3
  #iops: "5000"
  #throughput: "250"
  allowAutoIOPSPerGBIncrease: 'true'
  encrypted: 'true'
  fsType: xfs # 기본값이 ext4
EOF
kubectl get sc
kubectl describe sc gp3 | grep Parameters
- PVC/PV 파드 테스트
# 워커노드의 EBS 볼륨 확인 : tag(키/값) 필터링 - 링크
aws ec2 describe-volumes --filters Name=tag:Name,Values=$CLUSTER_NAME-ng1-Node --output table
aws ec2 describe-volumes --filters Name=tag:Name,Values=$CLUSTER_NAME-ng1-Node --query "Volumes[*].Attachments" | jq
aws ec2 describe-volumes --filters Name=tag:Name,Values=$CLUSTER_NAME-ng1-Node --query "Volumes[*].{ID:VolumeId,Tag:Tags}" | jq
aws ec2 describe-volumes --filters Name=tag:Name,Values=$CLUSTER_NAME-ng1-Node --query "Volumes[].[VolumeId, VolumeType, Attachments[].[InstanceId, State][]][]" | jq
aws ec2 describe-volumes --filters Name=tag:Name,Values=$CLUSTER_NAME-ng1-Node --query "Volumes[].{VolumeId: VolumeId, VolumeType: VolumeType, InstanceId: Attachments[0].InstanceId, State: Attachments[0].State}" | jq
# 워커노드에서 파드에 추가한 EBS 볼륨 확인
aws ec2 describe-volumes --filters Name=tag:ebs.csi.aws.com/cluster,Values=true --output table
aws ec2 describe-volumes --filters Name=tag:ebs.csi.aws.com/cluster,Values=true --query "Volumes[*].{ID:VolumeId,Tag:Tags}" | jq
aws ec2 describe-volumes --filters Name=tag:ebs.csi.aws.com/cluster,Values=true --query "Volumes[].{VolumeId: VolumeId, VolumeType: VolumeType, InstanceId: Attachments[0].InstanceId, State: Attachments[0].State}" | jq
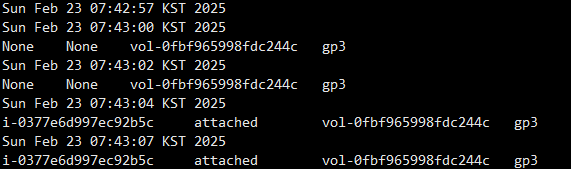
# 워커노드에서 파드에 추가한 EBS 볼륨 모니터링
while true; do aws ec2 describe-volumes --filters Name=tag:ebs.csi.aws.com/cluster,Values=true --query "Volumes[].{VolumeId: VolumeId, VolumeType: VolumeType, InstanceId: Attachments[0].InstanceId, State: Attachments[0].State}" --output text; date; sleep 1; done
# PVC 생성
cat <<EOF | kubectl apply -f -
apiVersion: v1
kind: PersistentVolumeClaim
metadata:
name: ebs-claim
spec:
accessModes:
- ReadWriteOnce
resources:
requests:
storage: 4Gi
storageClassName: gp3
EOF
kubectl get pvc,pv
# 파드 생성
cat <<EOF | kubectl apply -f -
apiVersion: v1
kind: Pod
metadata:
name: app
spec:
terminationGracePeriodSeconds: 3
containers:
- name: app
image: centos
command: ["/bin/sh"]
args: ["-c", "while true; do echo \$(date -u) >> /data/out.txt; sleep 5; done"]
volumeMounts:
- name: persistent-storage
mountPath: /data
volumes:
- name: persistent-storage
persistentVolumeClaim:
claimName: ebs-claim
EOF
# PVC, 파드 확인
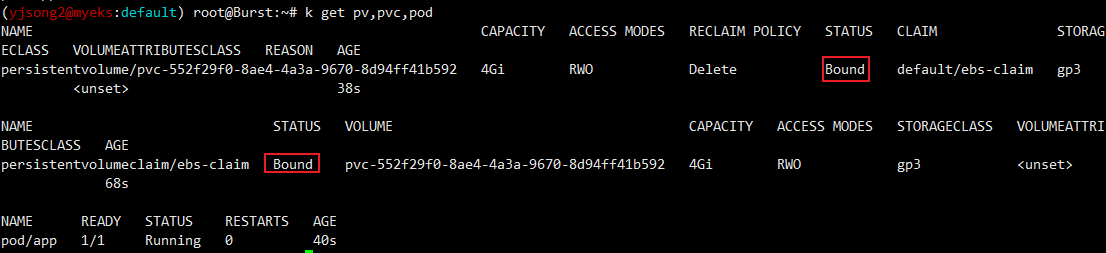
kubectl get pvc,pv,pod
kubectl get VolumeAttachment
kubectl df-pv
# 추가된 EBS 볼륨 상세 정보 확인 : AWS 관리콘솔 EC2(EBS)에서 확인
aws ec2 describe-volumes --volume-ids $(kubectl get pv -o jsonpath="{.items[0].spec.csi.volumeHandle}") | jq
# PV 상세 확인 : nodeAffinity 내용의 의미는?
kubectl get pv -o yaml
...
nodeAffinity:
required:
nodeSelectorTerms:
- matchExpressions:
- key: topology.ebs.csi.aws.com/zone
operator: In
values:
- ap-northeast-2b
...
kubectl get node --label-columns=topology.ebs.csi.aws.com/zone,topology.k8s.aws/zone-id
kubectl describe node
# 파일 내용 추가 저장 확인
kubectl exec app -- tail -f /data/out.txt
## 파드 내에서 볼륨 정보 확인
kubectl exec -it app -- sh -c 'df -hT --type=overlay'
kubectl exec -it app -- sh -c 'df -hT --type=xfs'- pv, pvc 생성 시 자동으로 ebs볼륨이 생성되는 것을 확인
- 볼륨 확인


- 볼륨 증가
- 늘릴수는 있어도 줄일수는 없음
# 현재 pv 의 이름을 기준하여 4G > 10G 로 증가 : .spec.resources.requests.storage의 4Gi 를 10Gi로 변경
kubectl patch pvc ebs-claim -p '{"spec":{"resources":{"requests":{"storage":"10Gi"}}}}'

# 확인 : 볼륨 용량 수정 반영이 되어야 되니, 수치 반영이 조금 느릴수 있다
kubectl exec -it app -- sh -c 'df -hT --type=xfs'
kubectl df-pv
aws ec2 describe-volumes --volume-ids $(kubectl get pv -o jsonpath="{.items[0].spec.csi.volumeHandle}") | jq

AWS Volume SnapShots Controller
- Volumesnapshots 컨트롤러 설치
# Install Snapshot CRDs
kubectl apply -f https://raw.githubusercontent.com/kubernetes-csi/external-snapshotter/master/client/config/crd/snapshot.storage.k8s.io_volumesnapshots.yaml
kubectl apply -f https://raw.githubusercontent.com/kubernetes-csi/external-snapshotter/master/client/config/crd/snapshot.storage.k8s.io_volumesnapshotclasses.yaml
kubectl apply -f https://raw.githubusercontent.com/kubernetes-csi/external-snapshotter/master/client/config/crd/snapshot.storage.k8s.io_volumesnapshotcontents.yaml
kubectl get crd | grep snapshot
kubectl api-resources  | grep snapshot

# Install Common Snapshot Controller
kubectl apply -f https://raw.githubusercontent.com/kubernetes-csi/external-snapshotter/master/deploy/kubernetes/snapshot-controller/rbac-snapshot-controller.yaml
kubectl apply -f https://raw.githubusercontent.com/kubernetes-csi/external-snapshotter/master/deploy/kubernetes/snapshot-controller/setup-snapshot-controller.yaml
kubectl get deploy -n kube-system snapshot-controller
kubectl get pod -n kube-system

# Install Snapshotclass
kubectl apply -f https://raw.githubusercontent.com/kubernetes-sigs/aws-ebs-csi-driver/master/examples/kubernetes/snapshot/manifests/classes/snapshotclass.yaml
kubectl get vsclass # 혹은 volumesnapshotclasses
kubectl describe vsclass
- 스냅샷컨트롤러 실습
- 테스트 PVC/파드 생성
# PVC 생성
cat <<EOF | kubectl apply -f -
apiVersion: v1
kind: PersistentVolumeClaim
metadata:
  name: ebs-claim
spec:
  accessModes:
    - ReadWriteOnce
  resources:
    requests:
      storage: 4Gi
  storageClassName: gp3
EOF
kubectl get pvc,pv

# 파드 생성
cat <<EOF | kubectl apply -f -
apiVersion: v1
kind: Pod
metadata:
  name: app
spec:
  terminationGracePeriodSeconds: 3
  containers:
  - name: app
    image: centos
    command: ["/bin/sh"]
    args: ["-c", "while true; do echo \$(date -u) >> /data/out.txt; sleep 5; done"]
    volumeMounts:
    - name: persistent-storage
      mountPath: /data
  volumes:
  - name: persistent-storage
    persistentVolumeClaim:
      claimName: ebs-claim
EOF

# 파일 내용 추가 저장 확인
kubectl exec app -- tail -f /data/out.txt

# VolumeSnapshot 생성 : Create a VolumeSnapshot referencing the PersistentVolumeClaim name
# AWS 관리 콘솔 EBS 스냅샷 확인
cat <<EOF | kubectl apply -f -
apiVersion: snapshot.storage.k8s.io/v1
kind: VolumeSnapshot
metadata:
  name: ebs-volume-snapshot
spec:
  volumeSnapshotClassName: csi-aws-vsc
  source:
    persistentVolumeClaimName: ebs-claim
EOF

# VolumeSnapshot 확인
kubectl get volumesnapshot
kubectl get volumesnapshot ebs-volume-snapshot -o jsonpath={.status.boundVolumeSnapshotContentName} ; echo
kubectl describe volumesnapshot.snapshot.storage.k8s.io ebs-volume-snapshot
kubectl get volumesnapshotcontents

# VolumeSnapshot ID 확인
kubectl get volumesnapshotcontents -o jsonpath='{.items[*].status.snapshotHandle}' ; echo

# AWS EBS 스냅샷 확인
aws ec2 describe-snapshots --owner-ids self | jq
aws ec2 describe-snapshots --owner-ids self --query 'Snapshots[]' --output table

# app & pvc 제거 : 강제로 장애 재현
kubectl delete pod app && kubectl delete pvc ebs-claim

- 스냅샷으로 복원
- pod 및 pvc 삭제 후, 볼륨 스냅샷을 복원들 통해 데이터 복원 확인
# 스냅샷에서 PVC 로 복원
kubectl get pvc,pv
cat <<EOF | kubectl apply -f -
apiVersion: v1
kind: PersistentVolumeClaim
metadata:
name: ebs-snapshot-restored-claim
spec:
storageClassName: gp3
accessModes:
- ReadWriteOnce
resources:
requests:
storage: 4Gi
dataSource:
name: ebs-volume-snapshot
kind: VolumeSnapshot
apiGroup: snapshot.storage.k8s.io
EOF
# 확인
kubectl get pvc,pv
# 파드 생성
cat <<EOF | kubectl apply -f -
apiVersion: v1
kind: Pod
metadata:
name: app
spec:
terminationGracePeriodSeconds: 3
containers:
- name: app
image: centos
command: ["/bin/sh"]
args: ["-c", "while true; do echo \$(date -u) >> /data/out.txt; sleep 5; done"]
volumeMounts:
- name: persistent-storage
mountPath: /data
volumes:
- name: persistent-storage
persistentVolumeClaim:
claimName: ebs-snapshot-restored-claim
EOF
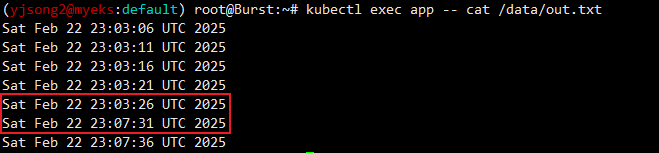
# 파일 내용 저장 확인 : 파드 삭제 전까지의 저장 기록이 남아 있다. 이후 파드 재생성 후 기록도 잘 저장되고 있다
kubectl exec app -- cat /data/out.txt
...
Sat Dec 24 15:12:24 UTC 2022
Sat Dec 24 15:12:24 UTC 2022
Sat Dec 24 15:24:23 UTC 2022
Sat Dec 24 15:24:23 UTC 2022
...
# 삭제
kubectl delete pod app && kubectl delete pvc ebs-snapshot-restored-claim && kubectl delete volumesnapshots ebs-volume-snapshot
- 데이터 확인 시. 3분정도 차이가 있으며 기존 데이터가 그대로 남아있는 것을 확인
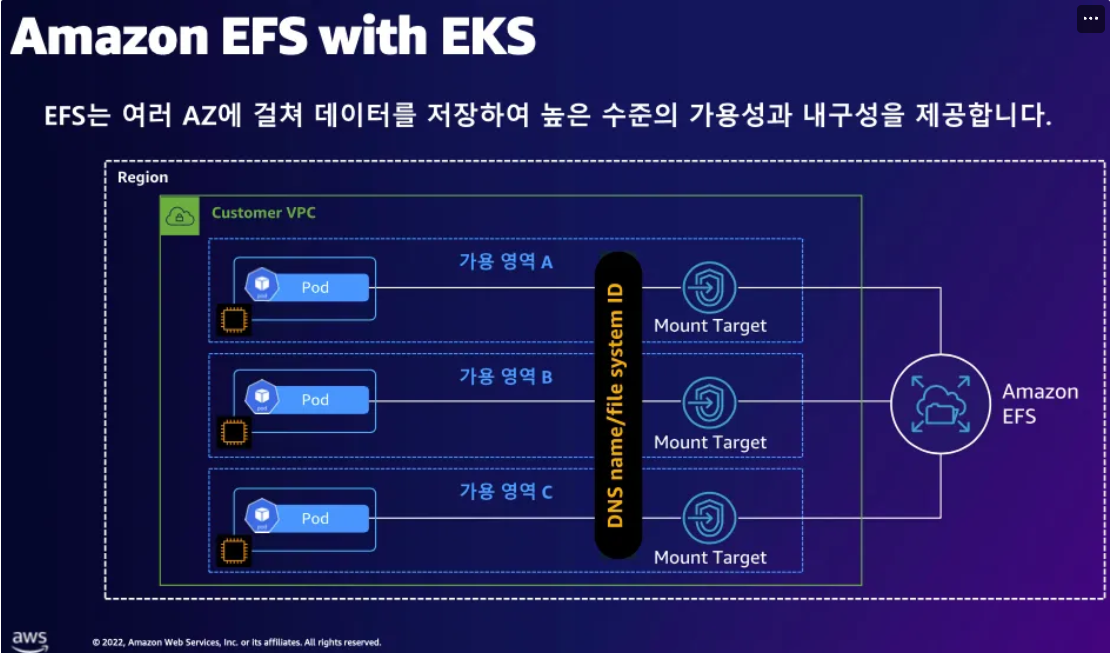
AWS EfS Controller
# EFS 정보 확인
aws efs describe-file-systems --query "FileSystems[*].FileSystemId" --output text

# 아래는 aws-efs-csi-driver 전체 버전 정보와 기본 설치 버전(True) 정보 확인
aws eks describe-addon-versions \
    --addon-name aws-efs-csi-driver \
    --kubernetes-version 1.31 \
    --query "addons[].addonVersions[].[addonVersion, compatibilities[].defaultVersion]" \
    --output text

# ISRA 설정 : 고객관리형 정책 AmazonEKS_EFS_CSI_Driver_Policy 사용
eksctl create iamserviceaccount \
  --name efs-csi-controller-sa \
  --namespace kube-system \
  --cluster ${CLUSTER_NAME} \
  --attach-policy-arn arn:aws:iam::aws:policy/service-role/AmazonEFSCSIDriverPolicy \
  --approve \
  --role-only \
  --role-name AmazonEKS_EFS_CSI_DriverRole

# ISRA 확인
eksctl get iamserviceaccount --cluster ${CLUSTER_NAME}

# Amazon EFS CSI driver addon 배포(설치)
export ACCOUNT_ID=$(aws sts get-caller-identity --query 'Account' --output text)
eksctl create addon --name aws-efs-csi-driver --cluster ${CLUSTER_NAME} --service-account-role-arn arn:aws:iam::${ACCOUNT_ID}:role/AmazonEKS_EFS_CSI_DriverRole --force
kubectl get sa -n kube-system efs-csi-controller-sa -o yaml | head -5

# 확인
eksctl get addon --cluster ${CLUSTER_NAME}
kubectl get pod -n kube-system -l "app.kubernetes.io/name=aws-efs-csi-driver,app.kubernetes.io/instance=aws-efs-csi-driver"
kubectl get pod -n kube-system -l app=efs-csi-controller -o jsonpath='{.items[0].spec.containers[*].name}' ; echo
kubectl get csidrivers efs.csi.aws.com -o yaml
- EFS 파일시스템을 파드가 사용하게 설정
# 모니터링
watch 'kubectl get sc efs-sc; echo; kubectl get pv,pvc,pod'
# [운영 서버 EC2]
# 실습 코드 clone
git clone https://github.com/kubernetes-sigs/aws-efs-csi-driver.git /root/efs-csi
cd /root/efs-csi/examples/kubernetes/multiple_pods/specs && tree
# EFS 스토리지클래스 생성 및 확인
cat storageclass.yaml
kubectl apply -f storageclass.yaml
kubectl get sc efs-sc
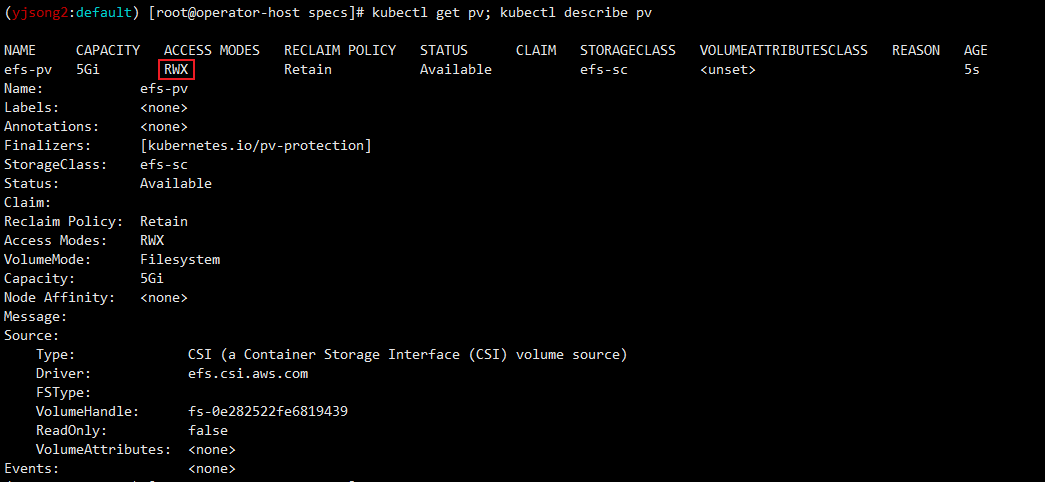
# PV 생성 및 확인 : volumeHandle을 자신의 EFS 파일시스템ID로 변경
EfsFsId=$(aws efs describe-file-systems --query "FileSystems[*].FileSystemId" --output text)
sed -i "s/fs-4af69aab/$EfsFsId/g" pv.yaml
kubectl apply -f pv.yaml
kubectl get pv; kubectl describe pv
# PVC 생성 및 확인
cat claim.yaml
kubectl apply -f claim.yaml
kubectl get pvc
# 파드 생성 및 연동 : 파드 내에 /data 데이터는 EFS를 사용
# 추후에 파드1,2가 각기 다른 노드에 배포되게 추가해두자!
cat pod1.yaml pod2.yaml
kubectl apply -f pod1.yaml,pod2.yaml
kubectl df-pv
# 파드 정보 확인 : PV에 5Gi 와 파드 내에서 확인한 NFS4 볼륨 크리 8.0E의 차이는 무엇?
kubectl get pods
kubectl exec -ti app1 -- sh -c "df -hT -t nfs4"
kubectl exec -ti app2 -- sh -c "df -hT -t nfs4"
# 공유 저장소 저장 동작 확인
tree /mnt/myefs # 운영서버 EC2 에서 확인
tail -f /mnt/myefs/out1.txt # 운영서버 EC2 에서 확인
tail -f /mnt/myefs/out2.txt # 운영서버 EC2 에서 확인
kubectl exec -ti app1 -- tail -f /data/out1.txt
kubectl exec -ti app2 -- tail -f /data/out2.txt
- 두 앱에 pv생성
- 하나의 EFS볼륨이 마운트되어 있는 것을 확인
- operrator-host VM에서도 동일 EFS볼륨 마운트


- EFS 파일시스템을 다수의 파드가 사용하게 설정
# 모니터링
watch 'kubectl get sc efs-sc; echo; kubectl get pv,pvc,pod'

# [운영 서버 EC2]
# EFS 스토리지클래스 생성 및 확인
curl -s -O https://raw.githubusercontent.com/kubernetes-sigs/aws-efs-csi-driver/master/examples/kubernetes/dynamic_provisioning/specs/storageclass.yaml
sed -i "s/fs-92107410/$EfsFsId/g" storageclass.yaml
kubectl apply -f storageclass.yaml
kubectl get sc efs-sc

# PVC/파드 생성 및 확인
curl -s -O https://raw.githubusercontent.com/kubernetes-sigs/aws-efs-csi-driver/master/examples/kubernetes/dynamic_provisioning/specs/pod.yaml

kubectl apply -f pod.yaml
kubectl get pvc,pv,pod

# PVC/PV 생성 로그 확인
kubectl krew install stern
kubectl stern -n kube-system -l app=efs-csi-controller -c csi-provisioner
혹은
kubectl logs  -n kube-system -l app=efs-csi-controller -c csi-provisioner -f

# 파드 정보 확인
kubectl exec -it efs-app -- sh -c "df -hT -t nfs4"

# 공유 저장소 저장 동작 확인
tree /mnt/myefs              # 운영서버 EC2 에서 확인
kubectl exec efs-app -- bash -c "cat /data/out"
kubectl exec efs-app -- bash -c "ls -l /data/out"
kubectl exec efs-app -- bash -c "stat /data/"
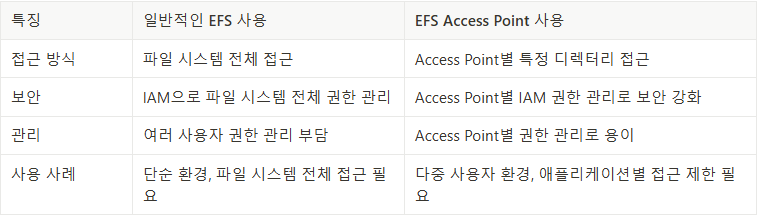
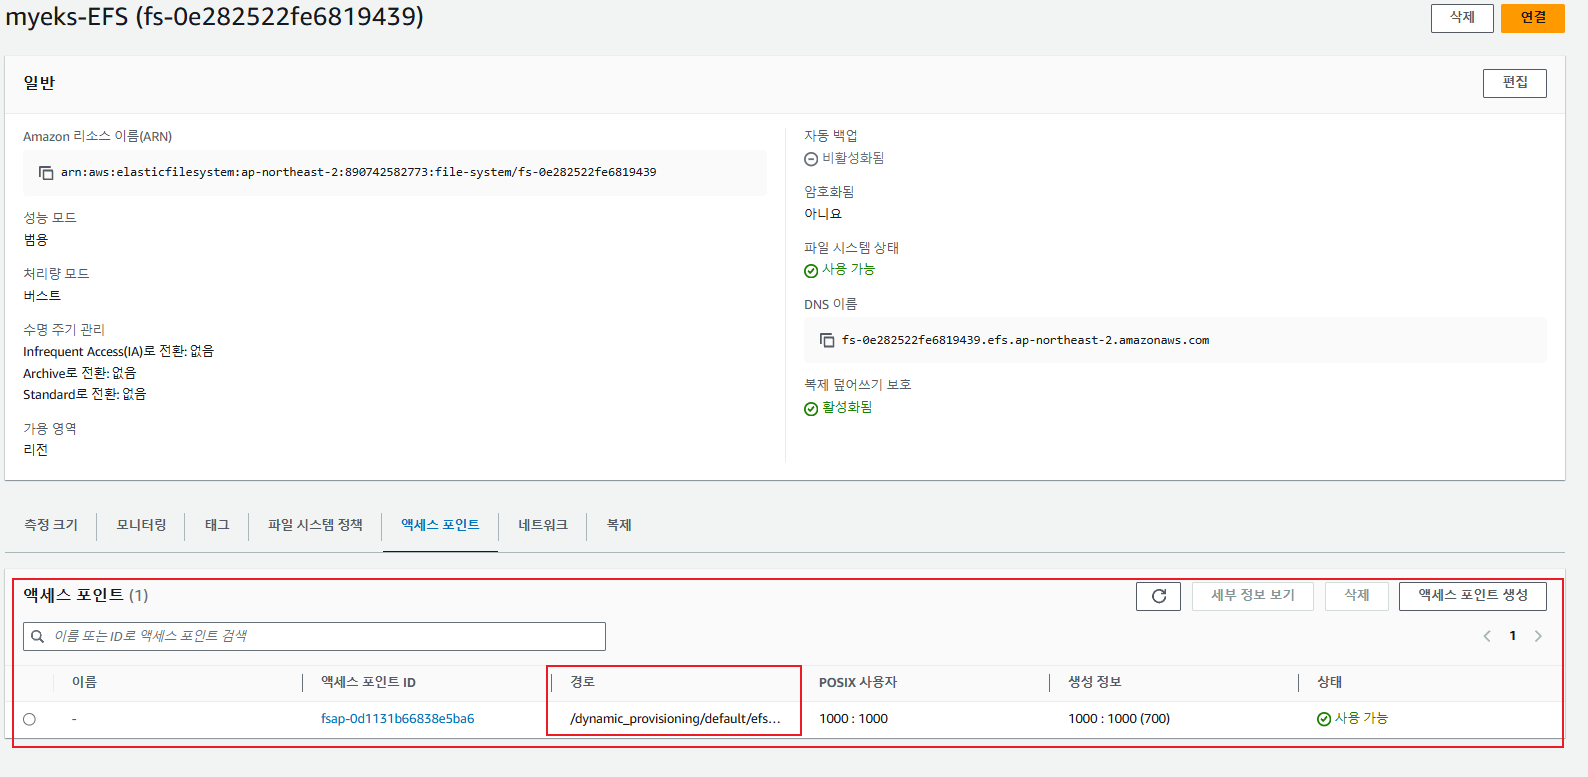
- EFS → Access Point 확인
- EFS Access Point는 EFS의 특정 부분을 격리하고, UID/GID를 강제하여 보안성을 높임.
- 여러 팀, 여러 애플리케이션이 같은 EFS를 사용할 때 Access Point를 활용하면 보안과 관리가 용이.
728x90
'2025_AEWS Study' 카테고리의 다른 글
| 4주차 - EKS Observability(1) Logging (0) | 2025.03.01 |
|---|---|
| 3주차 - EKS Storage & Managed Node Groups(4)(NodeGroup) (0) | 2025.02.23 |
| 3주차 - EKS Storage & Managed Node Groups(2)(Kubestr 모니터링 및 성능 측정 확인) (0) | 2025.02.19 |
| 3주차 - EKS Storage & Managed Node Groups(1)(스토리지) (0) | 2025.02.19 |
| 2주차 - EKS Networking(6)(Topology Aware Routing) (0) | 2025.02.16 |