

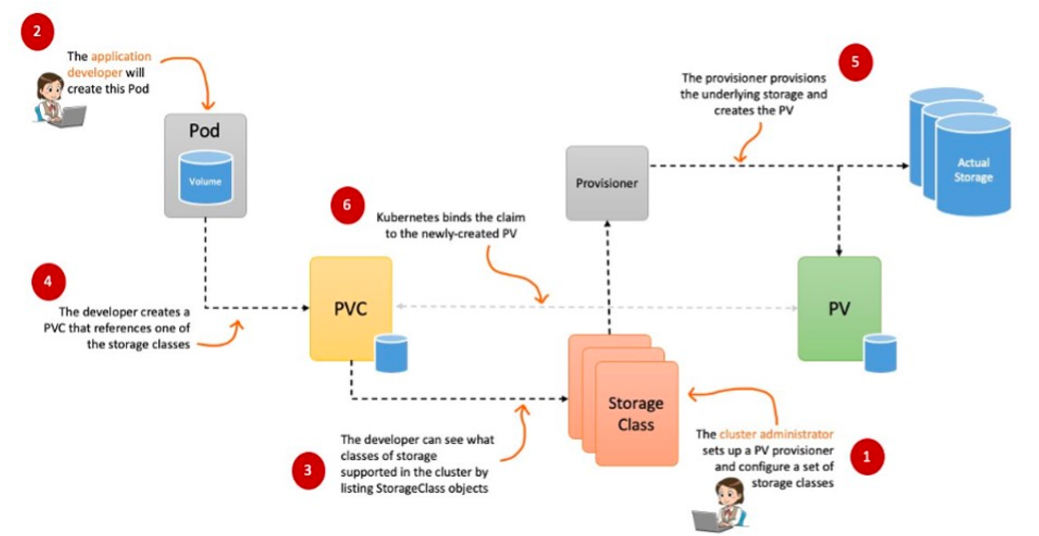
CSI
- Container Srotage Interface
- 쿠버네티스에서는 다양한 스토리지 연계를 위해 CSI 인터페이스를 제공
- CSI 인터페이스 덕분에 쿠버네티스에서 쉽게 스토리지(EBS, EFS 등)를 사용할 수 있음
- 쿠버네티스 CSI 인터페이스에 맞춰 개발된 AWS CSI
- EKS에서 EBS, EFS 등 AWS 스토리지를 다루려면 스토리지 별로 AWS CSI 드라이버를 설치해야 사용 가능
참고: https://malwareanalysis.tistory.com/598 (악분님 블로그)

3주차 EKS Storage에서는 EBS 및 EFS 실습을 진행하며 각 드라이버를 설치
K8S Storage
1. 파드 내부의 데이터는 파드가 정지되면 모두 삭제됨(휘발성) → 즉, 파드가 모두 상태가 없는(Stateless) 애플리케이션이였음! : Temporary filesystem, Volume
- 기본 컨테이너 환경의 임시 파일 시스템 실습
# 파드 배포
# date 명령어로 현재 시간을 10초 간격으로 /home/pod-out.txt 파일에 저장
curl -s -O https://raw.githubusercontent.com/gasida/PKOS/main/3/date-busybox-pod.yaml
cat date-busybox-pod.yaml | yh
kubectl apply -f date-busybox-pod.yaml

# 파일 확인
kubectl get pod
kubectl exec busybox -- tail -f /home/pod-out.txt
Sat Jan 28 15:33:11 UTC 2023
Sat Jan 28 15:33:21 UTC 2023
...

# 파드 삭제 후 다시 생성 후 파일 정보 확인 > 이전 기록이 보존되어 있는지?
kubectl delete pod busybox
kubectl apply -f date-busybox-pod.yaml
kubectl exec busybox -- tail -f /home/pod-out.txt

(yjsong@myeks:default) [root@myeks-bastion-EC2 ~]# kubectl exec busybox -- tail -f /home/pod-out.txt
Sat Mar 23 19:40:31 UTC 2024
Sat Mar 23 19:40:41 UTC 2024
Sat Mar 23 19:40:51 UTC 2024
Sat Mar 23 19:41:01 UTC 2024

...


# Pod 삭제 시 Pod에 저장된 Data도 삭제

# 실습 완료 후 삭제
kubectl delete pod busybox
2. 데이터베이스(파드)처럼 데이터 보존이 필요 == 상태가 있는(Stateful) 애플리케이션 : PV & PVC
→ 로컬 볼륨(hostPath) ⇒ 퍼시스턴트 볼륨(Persistent Volume, PV) - 어느 노드에서도 연결하여 사용 가능, 예시) NFS, AWS EBS, Ceph 등
- 호스트 Path 를 사용하는 PV/PVC : local-path-provisioner 스트리지 클래스 배포
# hostPath vs Local Path Provisioner(StorageClass 제공) 의 차이점과 장단점은?
→ Local Path Provisioner를 사용하면 디렉토리명을 다이나믹하게 지정 할 수 있음(ex: pvc-f0b9e730-a590-4505-9f90-f92cb356db2a_default_localpath-claim)
→ StorageClass를 사용하여 동적으로 PV를 사용 할 수 있음.
# Local Path Provisioner 설치
curl -s -O https://raw.githubusercontent.com/rancher/local-path-provisioner/master/deploy/local-path-storage.yaml
kubectl apply -f local-path-storage.yaml

# 확인
kubectl get-all -n local-path-storage
kubectl get pod -n local-path-storage -owide
kubectl describe cm -n local-path-storage local-path-config
kubectl get sc
kubectl get sc local-path
NAME         PROVISIONER             RECLAIMPOLICY   VOLUMEBINDINGMODE      ALLOWVOLUMEEXPANSION   AGE
local-path   rancher.io/local-path   Delete          WaitForFirstConsumer   false                  34s
# PV/PVC 를 사용하는 파드 생성
# PVC 생성
curl -s -O https://raw.githubusercontent.com/gasida/PKOS/main/3/localpath1.yaml
cat localpath1.yaml | yh
kubectl apply -f localpath1.yaml

# PVC 확인
kubectl get pvc
kubectl describe pvc

(yjsong@myeks:default) [root@myeks-bastion-EC2 ~]# kubectl get pvc

NAME              STATUS    VOLUME   CAPACITY   ACCESS MODES   STORAGECLASS   AGE
localpath-claim   Pending                                      local-path     41s

(yjsong@myeks:default) [root@myeks-bastion-EC2 ~]# kubectl describe pvc
Name:          localpath-claim
Namespace:     default
StorageClass:  local-path
Status:        Pending
Volume:
Labels:        <none>
Annotations:   <none>
Finalizers:    [kubernetes.io/pvc-protection]
Capacity:
Access Modes:
VolumeMode:    Filesystem
Used By:       <none>
Events:
  Type    Reason                Age                From                         Message
  ----    ------                ----               ----                         -------
  Normal  WaitForFirstConsumer  10s (x4 over 42s)  persistentvolume-controller  waiting for first consumer to be created before binding


# 파드 생성
curl -s -O https://raw.githubusercontent.com/gasida/PKOS/main/3/localpath2.yaml
cat localpath2.yaml | yh
kubectl apply -f localpath2.yaml

# 파드 확인
kubectl get pod,pv,pvc
kubectl describe pv    # Node Affinity 확인

(yjsong@myeks:default) [root@myeks-bastion-EC2 ~]# kubectl get pod,pv,pvc
NAME      READY   STATUS    RESTARTS   AGE
pod/app   1/1     Running   0          32s

NAME                                                        CAPACITY   ACCESS MODES   RECLAIM POLICY   STATUS   CLAIM                     STORAGECLASS   REASON   AGE
persistentvolume/pvc-f0b9e730-a590-4505-9f90-f92cb356db2a   1Gi        RWO            Delete           Bound    default/localpath-claim   local-path              30s

NAME                                    STATUS   VOLUME                                     CAPACITY   ACCESS MODES   STORAGECLASS   AGE
persistentvolumeclaim/localpath-claim   Bound    pvc-f0b9e730-a590-4505-9f90-f92cb356db2a   1Gi        RWO            local-path     3m18s

(yjsong@myeks:default) [root@myeks-bastion-EC2 ~]# kubectl describe pv
Name:              pvc-f0b9e730-a590-4505-9f90-f92cb356db2a
Labels:            <none>
Annotations:       local.path.provisioner/selected-node: ip-192-168-1-95.ap-northeast-2.compute.internal
                   pv.kubernetes.io/provisioned-by: rancher.io/local-path
Finalizers:        [kubernetes.io/pv-protection]
StorageClass:      local-path
Status:            Bound
Claim:             default/localpath-claim
Reclaim Policy:    Delete
Access Modes:      RWO
VolumeMode:        Filesystem
Capacity:          1Gi
Node Affinity:
  Required Terms:
    Term 0:        kubernetes.io/hostname in [ip-192-168-1-95.ap-northeast-2.compute.internal]
Message:
Source:
    Type:          HostPath (bare host directory volume)
    Path:          /opt/local-path-provisioner/pvc-f0b9e730-a590-4505-9f90-f92cb356db2a_default_localpath-claim
    HostPathType:  DirectoryOrCreate
Events:            <none>


# 워커노드 중 현재 파드가 배포되어 있다만, 아래 경로에 out.txt 파일 존재 확인
for node in $N1 $N2 $N3; do ssh ec2-user@$node tree /opt/local-path-provisioner; done

(yjsong@myeks:default) [root@myeks-bastion-EC2 ~]# for node in $N1 $N2 $N3; do ssh ec2-user@$node tree /opt/local-path-provisioner; done
/opt/local-path-provisioner
└── pvc-f0b9e730-a590-4505-9f90-f92cb356db2a_default_localpath-claim
    └── out.txt

1 directory, 1 file
/opt/local-path-provisioner [error opening dir]

0 directories, 0 files
/opt/local-path-provisioner [error opening dir]

0 directories, 0 files

# 해당 워커노드 자체에서 out.txt 파일 확인
(yjsong@myeks:default) [root@myeks-bastion-EC2 ~]# ssh ec2-user@$N1 tail -f /opt/local-path-provisioner/pvc-f0b9e730-a590-4505-9f90-f92cb356db2a_default_localpath-claim/out.txt
Sat Mar 23 20:07:29 UTC 2024
Sat Mar 23 20:07:34 UTC 2024
Sat Mar 23 20:07:39 UTC 2024
...
# 파드 삭제 후 파드 재생성해서 데이터 유지 되는지 확인
# 파드 삭제 후 PV/PVC 확인
kubectl delete pod app
kubectl get pod,pv,pvc

(yjsong@myeks:default) [root@myeks-bastion-EC2 ~]# kubectl get pod,pv,pvc
NAME                                                        CAPACITY   ACCESS MODES   RECLAIM POLICY   STATUS   CLAIM                     STORAGECLASS   REASON   AGE
persistentvolume/pvc-f0b9e730-a590-4505-9f90-f92cb356db2a   1Gi        RWO            Delete           Bound    default/localpath-claim   local-path              10m

NAME                                    STATUS   VOLUME                                     CAPACITY   ACCESS MODES   STORAGECLASS   AGE
persistentvolumeclaim/localpath-claim   Bound    pvc-f0b9e730-a590-4505-9f90-f92cb356db2a   1Gi        RWO            local-path     12m
(yjsong@myeks:default) [root@myeks-bastion-EC2 ~]# for node in $N1 $N2 $N3; do ssh ec2-user@$node tree /opt/local-path-provisioner; done
/opt/local-path-provisioner
└── pvc-f0b9e730-a590-4505-9f90-f92cb356db2a_default_localpath-claim
    └── out.txt

1 directory, 1 file
/opt/local-path-provisioner [error opening dir]

0 directories, 0 files
/opt/local-path-provisioner [error opening dir]

0 directories, 0 files

# 파드 다시 실행
kubectl apply -f localpath2.yaml

# 확인
kubectl exec -it app -- head /data/out.txt
kubectl exec -it app -- tail -f /data/out.txt

(yjsong@myeks:default) [root@myeks-bastion-EC2 ~]# kubectl exec -it app -- tail -f /data/out.txt
#Pod 삭제 전 Data 확인 가능
Sat Mar 23 20:09:29 UTC 2024
Sat Mar 23 20:09:34 UTC 2024
Sat Mar 23 20:09:39 UTC 2024
#Pod 재 기동 후 추가 Data 확인 가능
Sat Mar 23 20:09:44 UTC 2024
Sat Mar 23 20:09:49 UTC 2024
Sat Mar 23 20:09:54 UTC 2024
Sat Mar 23 20:09:59 UTC 2024
3. 파드가 생성될 때 자동으로 볼륨을 마운트하여 파드에 연결하는 기능을 동적 프로비저닝(Dynamic Provisioning)이라고 함
- Amazon EBS CSI driver as an Amazon EKS를 통한 동적 프로비저닝 실습
# EBS CSI driver 설치
# 아래는 aws-ebs-csi-driver 전체 버전 정보와 기본 설치 버전(True) 정보 확인
aws eks describe-addon-versions \
    --addon-name aws-ebs-csi-driver \
    --kubernetes-version 1.28 \
    --query "addons[].addonVersions[].[addonVersion, compatibilities[].defaultVersion]" \
    --output text

# ISRA 설정 : AWS관리형 정책 AmazonEBSCSIDriverPolicy 사용
eksctl create iamserviceaccount \
  --name ebs-csi-controller-sa \
  --namespace kube-system \
  --cluster ${CLUSTER_NAME} \
  --attach-policy-arn arn:aws:iam::aws:policy/service-role/AmazonEBSCSIDriverPolicy \
  --approve \
  --role-only \
  --role-name AmazonEKS_EBS_CSI_DriverRole

# ISRA 확인
eksctl get iamserviceaccount --cluster myeks

(yjsong@myeks:default) [root@myeks-bastion-EC2 ~]# eksctl get iamserviceaccount --cluster myeks
NAMESPACE	NAME			ROLE ARN
kube-system	ebs-csi-controller-sa	arn:aws:iam::590183955668:role/AmazonEKS_EBS_CSI_DriverRole

# Amazon EBS CSI driver addon 추가
eksctl create addon --name aws-ebs-csi-driver --cluster ${CLUSTER_NAME} --service-account-role-arn arn:aws:iam::${ACCOUNT_ID}:role/AmazonEKS_EBS_CSI_DriverRole --force
kubectl get sa -n kube-system ebs-csi-controller-sa -o yaml | head -5

# 확인
eksctl get addon --cluster ${CLUSTER_NAME}
kubectl get deploy,ds -l=app.kubernetes.io/name=aws-ebs-csi-driver -n kube-system
kubectl get pod -n kube-system -l 'app in (ebs-csi-controller,ebs-csi-node)'
kubectl get pod -n kube-system -l app.kubernetes.io/component=csi-driver

# ebs-csi-controller 파드에 6개 컨테이너 확인
kubectl get pod -n kube-system -l app=ebs-csi-controller -o jsonpath='{.items[0].spec.containers[*].name}' ; echo
ebs-plugin csi-provisioner csi-attacher csi-snapshotter csi-resizer liveness-probe

# csinodes 확인
kubectl get csinodes

(yjsong@myeks:default) [root@myeks-bastion-EC2 ~]# kubectl get pod -n kube-system -l app.kubernetes.io/component=csi-driver
NAME                                 READY   STATUS    RESTARTS   AGE
ebs-csi-controller-765cf7cf9-bh7ll   5/6     Running   0          16s
ebs-csi-controller-765cf7cf9-mtktv   5/6     Running   0          16s
ebs-csi-node-mdfbt                   3/3     Running   0          16s
ebs-csi-node-qf8v7                   3/3     Running   0          16s
ebs-csi-node-rgxb6                   3/3     Running   0          16s
# gp3 스토리지 클래스 생성
kubectl get sc
cat <<EOT > gp3-sc.yaml
kind: StorageClass
apiVersion: storage.k8s.io/v1
metadata:
  name: gp3
allowVolumeExpansion: true
provisioner: ebs.csi.aws.com
volumeBindingMode: WaitForFirstConsumer
parameters:
  type: gp3
  #iops: "5000"
  #throughput: "250"
  allowAutoIOPSPerGBIncrease: 'true'
  encrypted: 'true'
  fsType: xfs # 기본값이 ext4
EOT
kubectl apply -f gp3-sc.yaml
kubectl get sc
kubectl describe sc gp3 | grep Parameters

(yjsong@myeks:default) [root@myeks-bastion-EC2 ~]# kubectl get sc
NAME            PROVISIONER             RECLAIMPOLICY   VOLUMEBINDINGMODE      ALLOWVOLUMEEXPANSION   AGE
gp2 (default)   kubernetes.io/aws-ebs   Delete          WaitForFirstConsumer   false                  149m
gp3             ebs.csi.aws.com         Delete          WaitForFirstConsumer   true                   17s
local-path      rancher.io/local-path   Delete          WaitForFirstConsumer   false                  62m
(yjsong@myeks:default) [root@myeks-bastion-EC2 ~]# kubectl describe sc gp3 | grep Parameters
Parameters:            allowAutoIOPSPerGBIncrease=true,encrypted=true,fsType=xfs,type=gp3
# PVC/PV 파드 생성 및 동적 프로비저닝 실습
# 워커노드의 EBS 볼륨 확인 : tag(키/값) 필터링 - 링크
aws ec2 describe-volumes --filters Name=tag:Name,Values=$CLUSTER_NAME-ng1-Node --output table
aws ec2 describe-volumes --filters Name=tag:Name,Values=$CLUSTER_NAME-ng1-Node --query "Volumes[*].Attachments" | jq
aws ec2 describe-volumes --filters Name=tag:Name,Values=$CLUSTER_NAME-ng1-Node --query "Volumes[*].{ID:VolumeId,Tag:Tags}" | jq
aws ec2 describe-volumes --filters Name=tag:Name,Values=$CLUSTER_NAME-ng1-Node --query "Volumes[].[VolumeId, VolumeType, Attachments[].[InstanceId, State][]][]" | jq
aws ec2 describe-volumes --filters Name=tag:Name,Values=$CLUSTER_NAME-ng1-Node --query "Volumes[].{VolumeId: VolumeId, VolumeType: VolumeType, InstanceId: Attachments[0].InstanceId, State: Attachments[0].State}" | jq

# 워커노드에서 파드에 추가한 EBS 볼륨 확인
aws ec2 describe-volumes --filters Name=tag:ebs.csi.aws.com/cluster,Values=true --output table
aws ec2 describe-volumes --filters Name=tag:ebs.csi.aws.com/cluster,Values=true --query "Volumes[*].{ID:VolumeId,Tag:Tags}" | jq
aws ec2 describe-volumes --filters Name=tag:ebs.csi.aws.com/cluster,Values=true --query "Volumes[].{VolumeId: VolumeId, VolumeType: VolumeType, InstanceId: Attachments[0].InstanceId, State: Attachments[0].State}" | jq

# 워커노드에서 파드에 추가한 EBS 볼륨 모니터링
while true; do aws ec2 describe-volumes --filters Name=tag:ebs.csi.aws.com/cluster,Values=true --query "Volumes[].{VolumeId: VolumeId, VolumeType: VolumeType, InstanceId: Attachments[0].InstanceId, State: Attachments[0].State}" --output text; date; sleep 1; done

# PVC 생성
cat <<EOT > awsebs-pvc.yaml
apiVersion: v1
kind: PersistentVolumeClaim
metadata:
  name: ebs-claim
spec:
  accessModes:
    - ReadWriteOnce
  resources:
    requests:
      storage: 4Gi
  storageClassName: gp3
EOT
kubectl apply -f awsebs-pvc.yaml
kubectl get pvc,pv

# 파드 생성
cat <<EOT > awsebs-pod.yaml
apiVersion: v1
kind: Pod
metadata:
  name: app
spec:
  terminationGracePeriodSeconds: 3
  containers:
  - name: app
    image: centos
    command: ["/bin/sh"]
    args: ["-c", "while true; do echo \$(date -u) >> /data/out.txt; sleep 5; done"]
    volumeMounts:
    - name: persistent-storage
      mountPath: /data
  volumes:
  - name: persistent-storage
    persistentVolumeClaim:
      claimName: ebs-claim
EOT
kubectl apply -f awsebs-pod.yaml

# PVC, 파드 확인
kubectl get pvc,pv,pod
kubectl get VolumeAttachment

(yjsong@myeks:default) [root@myeks-bastion-EC2 ~]# kubectl get pvc,pv,pod

NAME                              STATUS   VOLUME                                     CAPACITY   ACCESS MODES   STORAGECLASS   AGE
persistentvolumeclaim/ebs-claim   Bound    pvc-21ca6169-bbae-4fa8-b957-414c236aa8f0   4Gi        RWO            gp3            24s

NAME                                                        CAPACITY   ACCESS MODES   RECLAIM POLICY   STATUS   CLAIM               STORAGECLASS   REASON   AGE
persistentvolume/pvc-21ca6169-bbae-4fa8-b957-414c236aa8f0   4Gi        RWO            Delete           Bound    default/ebs-claim   gp3                     5s

NAME      READY   STATUS              RESTARTS   AGE
pod/app   0/1     ContainerCreating   0          10s
(yjsong@myeks:default) [root@myeks-bastion-EC2 ~]# kubectl get VolumeAttachment
NAME                                                                   ATTACHER          PV                                         NODE                                              ATTACHED   AGE
csi-7d7ae8ba21b03962deefb76cd81a22da642a7c89793c4e6fa9412b2b2e0d49eb   ebs.csi.aws.com   pvc-21ca6169-bbae-4fa8-b957-414c236aa8f0   ip-192-168-1-95.ap-northeast-2.compute.internal   true       6s

# 추가된 EBS 볼륨 상세 정보 확인
aws ec2 describe-volumes --volume-ids $(kubectl get pv -o jsonpath="{.items[0].spec.csi.volumeHandle}") | jq


# 파일 내용 추가 저장 확인
kubectl exec app -- tail -f /data/out.txt

(yjsong@myeks:default) [root@myeks-bastion-EC2 ~]# kubectl exec app -- tail -f /data/out.txt
Sat Mar 23 21:01:57 UTC 2024
Sat Mar 23 21:02:02 UTC 2024
Sat Mar 23 21:02:07 UTC 2024
Sat Mar 23 21:02:12 UTC 2024
Sat Mar 23 21:02:17 UTC 2024
Sat Mar 23 21:02:22 UTC 2024

kubectl df-pv

(yjsong@myeks:default) [root@myeks-bastion-EC2 ~]# kubectl df-pv

 PV NAME                                   PVC NAME   NAMESPACE  NODE NAME                                        POD NAME  VOLUME MOUNT NAME   SIZE  USED  AVAILABLE  %USED  IUSED  IFREE    %IUSED
 pvc-21ca6169-bbae-4fa8-b957-414c236aa8f0  ebs-claim  default    ip-192-168-1-95.ap-northeast-2.compute.internal  app       persistent-storage  3Gi   60Mi  3Gi        1.50   4      2097148  0.00


## 파드 내에서 볼륨 정보 확인
kubectl exec -it app -- sh -c 'df -hT --type=overlay'
kubectl exec -it app -- sh -c 'df -hT --type=xfs'

(yjsong@myeks:default) [root@myeks-bastion-EC2 ~]# kubectl exec -it app -- sh -c 'df -hT --type=xfs'
Filesystem     Type  Size  Used Avail Use% Mounted on
/dev/nvme1n1   xfs   4.0G   61M  3.9G   2% /data
/dev/nvme0n1p1 xfs    30G  3.8G   27G  13% /etc/hosts
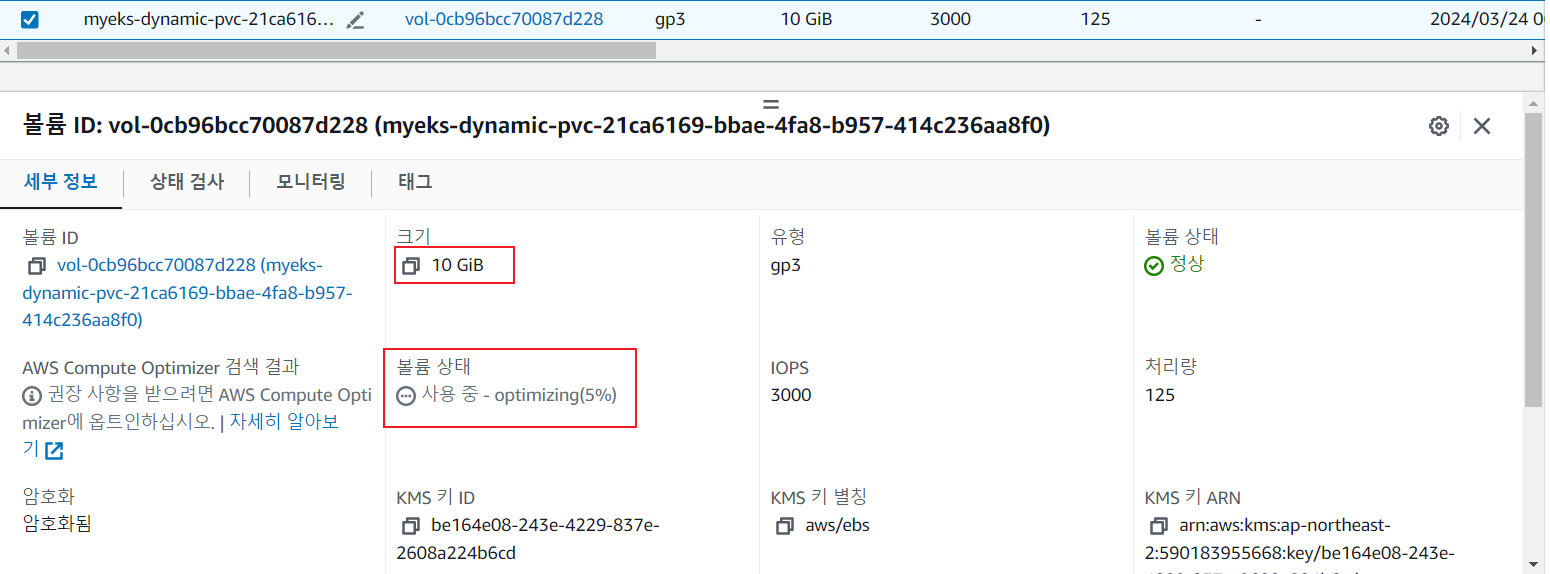
# Pod에 할당 된 EBS 볼륨 증가 실습
# 현재 pv 의 이름을 기준하여 4G > 10G 로 증가 : .spec.resources.requests.storage의 4Gi 를 10Gi로 변경
kubectl get pvc ebs-claim -o jsonpath={.spec.resources.requests.storage} ; echo
kubectl get pvc ebs-claim -o jsonpath={.status.capacity.storage} ; echo
kubectl patch pvc ebs-claim -p '{"spec":{"resources":{"requests":{"storage":"10Gi"}}}}'


# 확인 : 볼륨 용량 수정 반영이 되어야 되니, 수치 반영이 조금 느릴수 있다
kubectl exec -it app -- sh -c 'df -hT --type=xfs'
kubectl df-pv
aws ec2 describe-volumes --volume-ids $(kubectl get pv -o jsonpath="{.items[0].spec.csi.volumeHandle}") | jq

(yjsong@myeks:default) [root@myeks-bastion-EC2 ~]# kubectl exec -it app -- sh -c 'df -hT --type=xfs'
Filesystem     Type  Size  Used Avail Use% Mounted on
/dev/nvme1n1   xfs    10G  105M  9.9G   2% /data
/dev/nvme0n1p1 xfs    30G  3.8G   27G  13% /etc/hosts

(yjsong@myeks:default) [root@myeks-bastion-EC2 ~]# kubectl df-pv

 PV NAME                                   PVC NAME   NAMESPACE  NODE NAME                                        POD NAME  VOLUME MOUNT NAME   SIZE  USED   AVAILABLE  %USED  IUSED  IFREE    %IUSED
 pvc-21ca6169-bbae-4fa8-b957-414c236aa8f0  ebs-claim  default    ip-192-168-1-95.ap-northeast-2.compute.internal  app       persistent-storage  9Gi   104Mi  9Gi        1.02   4      5242876  0.00
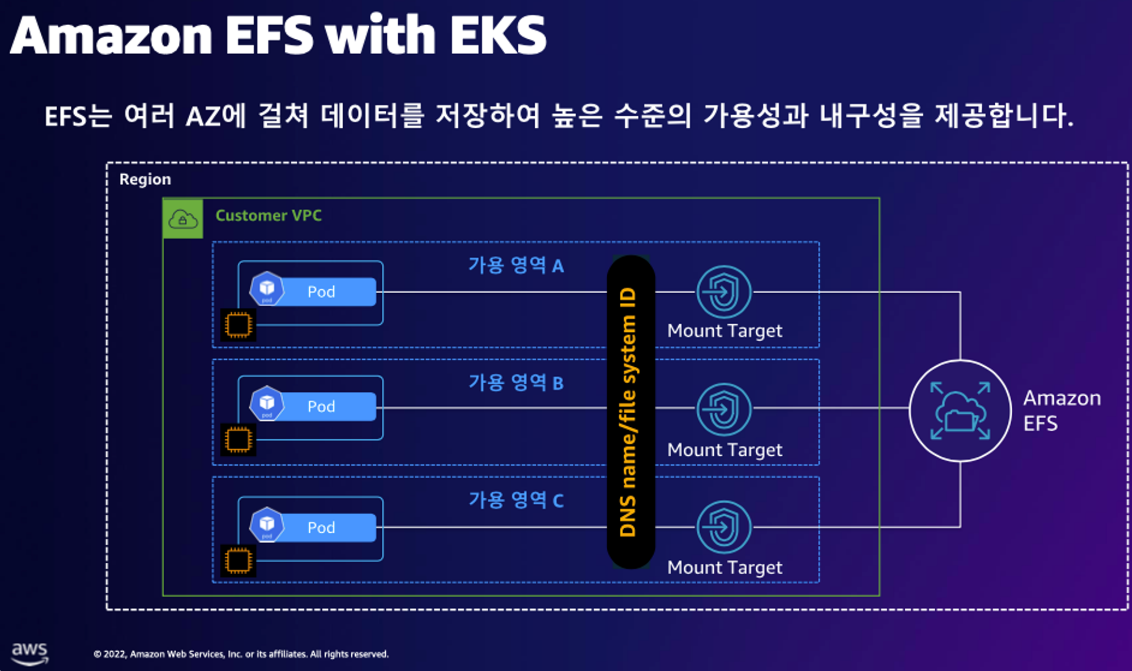
- Amazon EFS CSI driver as an Amazon EKS를 통한 동적 프로비저닝 실습
# EFS CSI driver 설치
# EFS 정보 확인
aws efs describe-file-systems --query "FileSystems[*].FileSystemId" --output text

# IAM 정책 생성
curl -s -O https://raw.githubusercontent.com/kubernetes-sigs/aws-efs-csi-driver/master/docs/iam-policy-example.json
aws iam create-policy --policy-name AmazonEKS_EFS_CSI_Driver_Policy --policy-document file://iam-policy-example.json

# ISRA 설정 : 고객관리형 정책 AmazonEKS_EFS_CSI_Driver_Policy 사용
eksctl create iamserviceaccount \
  --name efs-csi-controller-sa \
  --namespace kube-system \
  --cluster ${CLUSTER_NAME} \
  --attach-policy-arn arn:aws:iam::${ACCOUNT_ID}:policy/AmazonEKS_EFS_CSI_Driver_Policy \
  --approve

# ISRA 확인
kubectl get sa -n kube-system efs-csi-controller-sa -o yaml | head -5
eksctl get iamserviceaccount --cluster myeks

# EFS Controller 설치
helm repo add aws-efs-csi-driver https://kubernetes-sigs.github.io/aws-efs-csi-driver/
helm repo update
helm upgrade -i aws-efs-csi-driver aws-efs-csi-driver/aws-efs-csi-driver \
    --namespace kube-system \
    --set image.repository=602401143452.dkr.ecr.${AWS_DEFAULT_REGION}.amazonaws.com/eks/aws-efs-csi-driver \
    --set controller.serviceAccount.create=false \
    --set controller.serviceAccount.name=efs-csi-controller-sa

# 확인
helm list -n kube-system
kubectl get pod -n kube-system -l "app.kubernetes.io/name=aws-efs-csi-driver,app.kubernetes.io/instance=aws-efs-csi-driver"
(yjsong@myeks:default) [root@myeks-bastion-EC2 ~]# helm list -n kube-system

NAME              	NAMESPACE  	REVISION	UPDATED                                	STATUS  	CHART                   	APP VERSION
aws-efs-csi-driver	kube-system	1       	2024-03-24 06:15:42.125309795 +0900 KST	deployed	aws-efs-csi-driver-2.5.6	1.7.6
kube-ops-view     	kube-system	1       	2024-03-24 04:36:14.044161985 +0900 KST	deployed	kube-ops-view-1.2.2     	20.4.0
(yjsong@myeks:default) [root@myeks-bastion-EC2 ~]# kubectl get pod -n kube-system -l "app.kubernetes.io/name=aws-efs-csi-driver,app.kubernetes.io/instance=aws-efs-csi-driver"
NAME                                  READY   STATUS              RESTARTS   AGE
efs-csi-controller-789c8bf7bf-4296l   0/3     ContainerCreating   0          8s
efs-csi-controller-789c8bf7bf-bqd6t   0/3     ContainerCreating   0          8s
efs-csi-node-9c9qm                    0/3     ContainerCreating   0          8s
efs-csi-node-b5hw4                    0/3     ContainerCreating   0          8s
efs-csi-node-ssz2z                    0/3     ContainerCreating   0          8s
# EFS 스토리지 Pod 할당 실습
# 모니터링
watch 'kubectl get sc efs-sc; echo; kubectl get pv,pvc,pod'

# 실습 코드 clone
git clone https://github.com/kubernetes-sigs/aws-efs-csi-driver.git /root/efs-csi
cd /root/efs-csi/examples/kubernetes/multiple_pods/specs && tree

# EFS 스토리지클래스 생성 및 확인
cat storageclass.yaml | yh
kubectl apply -f storageclass.yaml
kubectl get sc efs-sc

# PV 생성 및 확인 : volumeHandle을 자신의 EFS 파일시스템ID로 변경
EfsFsId=$(aws efs describe-file-systems --query "FileSystems[*].FileSystemId" --output text)
sed -i "s/fs-4af69aab/$EfsFsId/g" pv.yaml

cat pv.yaml | yh
apiVersion: v1
kind: PersistentVolume
metadata:
  name: efs-pv
spec:
  capacity:
    storage: 5Gi
  volumeMode: Filesystem
  accessModes:
    - ReadWriteMany
  persistentVolumeReclaimPolicy: Retain
  storageClassName: efs-sc
  csi:
    driver: efs.csi.aws.com
    volumeHandle: fs-05699d3c12ef609e2

kubectl apply -f pv.yaml
kubectl get pv; kubectl describe pv

# PVC 생성 및 확인
cat claim.yaml | yh
kubectl apply -f claim.yaml
kubectl get pvc

# 파드 생성 및 연동 : 파드 내에 /data 데이터는 EFS를 사용
cat pod1.yaml pod2.yaml | yh
kubectl apply -f pod1.yaml,pod2.yaml
kubectl df-pv

(yjsong@myeks:default) [root@myeks-bastion-EC2 specs]# kubectl df-pv

 PV NAME                                   PVC NAME   NAMESPACE  NODE NAME                                        POD NAME  VOLUME MOUNT NAME   SIZE  USED   AVAILABLE  %USED  IUSED  IFREE    %IUSED
 pvc-21ca6169-bbae-4fa8-b957-414c236aa8f0  ebs-claim  default    ip-192-168-1-95.ap-northeast-2.compute.internal  app       persistent-storage  9Gi   104Mi  9Gi        1.02   4      5242876  0.00

# 파드 정보 확인 : PV에 5Gi 와 파드 내에서 확인한 NFS4 볼륨 크리 8.0E의 차이는 무엇? 파드에 6Gi 이상 저장 가능한가?
kubectl get pods
kubectl exec -ti app1 -- sh -c "df -hT -t nfs4"
kubectl exec -ti app2 -- sh -c "df -hT -t nfs4"


# 공유 저장소 저장 동작 확인
tree /mnt/myefs              # 작업용EC2에서 확인
tail -f /mnt/myefs/out1.txt  # 작업용EC2에서 확인
kubectl exec -ti app1 -- tail -f /data/out1.txt
kubectl exec -ti app2 -- tail -f /data/out2.txt
- AWS Volume SnapShots Controller
# Snapshots Controller 설치
# (참고) EBS CSI Driver에 snapshots 기능 포함 될 것으로 보임
kubectl describe pod -n kube-system -l app=ebs-csi-controller

# Install Snapshot CRDs
curl -s -O https://raw.githubusercontent.com/kubernetes-csi/external-snapshotter/master/client/config/crd/snapshot.storage.k8s.io_volumesnapshots.yaml
curl -s -O https://raw.githubusercontent.com/kubernetes-csi/external-snapshotter/master/client/config/crd/snapshot.storage.k8s.io_volumesnapshotclasses.yaml
curl -s -O https://raw.githubusercontent.com/kubernetes-csi/external-snapshotter/master/client/config/crd/snapshot.storage.k8s.io_volumesnapshotcontents.yaml
kubectl apply -f snapshot.storage.k8s.io_volumesnapshots.yaml,snapshot.storage.k8s.io_volumesnapshotclasses.yaml,snapshot.storage.k8s.io_volumesnapshotcontents.yaml
kubectl get crd | grep snapshot
kubectl api-resources  | grep snapshot

# Install Common Snapshot Controller
curl -s -O https://raw.githubusercontent.com/kubernetes-csi/external-snapshotter/master/deploy/kubernetes/snapshot-controller/rbac-snapshot-controller.yaml
curl -s -O https://raw.githubusercontent.com/kubernetes-csi/external-snapshotter/master/deploy/kubernetes/snapshot-controller/setup-snapshot-controller.yaml
kubectl apply -f rbac-snapshot-controller.yaml,setup-snapshot-controller.yaml
kubectl get deploy -n kube-system snapshot-controller
kubectl get pod -n kube-system -l app=snapshot-controller

# Install Snapshotclass
curl -s -O https://raw.githubusercontent.com/kubernetes-sigs/aws-ebs-csi-driver/master/examples/kubernetes/snapshot/manifests/classes/snapshotclass.yaml
kubectl apply -f snapshotclass.yaml
kubectl get vsclass # 혹은 volumesnapshotclasses

(yjsong@myeks:default) [root@myeks-bastion-EC2 ~]# kubectl get vsclass
NAME          DRIVER            DELETIONPOLICY   AGE
csi-aws-vsc   ebs.csi.aws.com   Delete           28s
# PV 및 Pod 생성
# PVC 생성
kubectl apply -f awsebs-pvc.yaml

# 파드 생성
kubectl apply -f awsebs-pod.yaml

# 파일 내용 추가 저장 확인
kubectl exec app -- tail -f /data/out.txt

# VolumeSnapshot 생성 : Create a VolumeSnapshot referencing the PersistentVolumeClaim name >> EBS 스냅샷 확인
curl -s -O https://raw.githubusercontent.com/gasida/PKOS/main/3/ebs-volume-snapshot.yaml
cat ebs-volume-snapshot.yaml | yh
kubectl apply -f ebs-volume-snapshot.yaml

# VolumeSnapshot 확인
kubectl get volumesnapshot
kubectl get volumesnapshot ebs-volume-snapshot -o jsonpath={.status.boundVolumeSnapshotContentName} ; echo
kubectl describe volumesnapshot.snapshot.storage.k8s.io ebs-volume-snapshot
kubectl get volumesnapshotcontents

(yjsong@myeks:default) [root@myeks-bastion-EC2 ~]# kubectl get volumesnapshot

NAME                  READYTOUSE   SOURCEPVC   SOURCESNAPSHOTCONTENT   RESTORESIZE   SNAPSHOTCLASS   SNAPSHOTCONTENT                                    CREATIONTIME   AGE
ebs-volume-snapshot   true         ebs-claim                           4Gi           csi-aws-vsc     snapcontent-3f39f935-14b9-4a9d-8d1c-30a4e3938cdc   67s            67s
(yjsong@myeks:default) [root@myeks-bastion-EC2 ~]# kubectl get volumesnapshot ebs-volume-snapshot -o jsonpath={.status.boundVolumeSnapshotContentName} ; echo
snapcontent-3f39f935-14b9-4a9d-8d1c-30a4e3938cdc


# VolumeSnapshot ID 확인
kubectl get volumesnapshotcontents -o jsonpath='{.items[*].status.snapshotHandle}' ; echo

# AWS EBS 스냅샷 확인
aws ec2 describe-snapshots --owner-ids self | jq
aws ec2 describe-snapshots --owner-ids self --query 'Snapshots[]' --output table

# app & pvc 제거 : 강제로 장애 재현
kubectl delete pod app && kubectl delete pvc ebs-claim

# 스냅샷 복원 실습
# 스냅샷에서 PVC 로 복원
kubectl get pvc,pv
cat <<EOT > ebs-snapshot-restored-claim.yaml
apiVersion: v1
kind: PersistentVolumeClaim
metadata:
  name: ebs-snapshot-restored-claim
spec:
  storageClassName: gp3
  accessModes:
    - ReadWriteOnce
  resources:
    requests:
      storage: 4Gi
  dataSource:
    name: ebs-volume-snapshot
    kind: VolumeSnapshot
    apiGroup: snapshot.storage.k8s.io
EOT
cat ebs-snapshot-restored-claim.yaml | yh
kubectl apply -f ebs-snapshot-restored-claim.yaml

# 확인
kubectl get pvc,pv

# 파드 생성
curl -s -O https://raw.githubusercontent.com/gasida/PKOS/main/3/ebs-snapshot-restored-pod.yaml
cat ebs-snapshot-restored-pod.yaml | yh
kubectl apply -f ebs-snapshot-restored-pod.yaml

# 파일 내용 저장 확인 : 파드 삭제 전까지의 저장 기록이 남아 있다. 이후 파드 재생성 후 기록도 잘 저장되고 있다
kubectl exec app -- cat /data/out.txt
(yjsong@myeks:default) [root@myeks-bastion-EC2 ~]# kubectl exec app -- cat /data/out.txt
Sat Mar 23 22:24:08 UTC 2024
Sat Mar 23 22:24:13 UTC 2024
Sat Mar 23 22:24:18 UTC 2024
Sat Mar 23 22:24:23 UTC 2024
Sat Mar 23 22:24:28 UTC 2024
...

# 삭제
kubectl delete pod app && kubectl delete pvc ebs-snapshot-restored-claim && kubectl delete volumesnapshots ebs-volume-snapshot
다양한 NodeGroup
- EKS Persistent Volumes for Instance Store
- 일반 EBS(기본값 3000IOPS) 보다 인스턴스 스토어 평균 IOPS 속도는 약 7배 빠름
# 인스턴스 스토어 볼륨이 있는 c5 모든 타입의 스토리지 크기
aws ec2 describe-instance-types \
 --filters "Name=instance-type,Values=c5*" "Name=instance-storage-supported,Values=true" \
 --query "InstanceTypes[].[InstanceType, InstanceStorageInfo.TotalSizeInGB]" \
 --output table
--------------------------
|  DescribeInstanceTypes |
+---------------+--------+
|  c5d.large    |  50    |
|  c5d.12xlarge |  1800  |
...

# 신규 노드 그룹 생성
eksctl create nodegroup --help
eksctl create nodegroup -c $CLUSTER_NAME -r $AWS_DEFAULT_REGION --subnet-ids "$PubSubnet1","$PubSubnet2","$PubSubnet3" --ssh-access \
  -n ng2 -t c5d.large -N 1 -m 1 -M 1 --node-volume-size=30 --node-labels disk=nvme --max-pods-per-node 100 --dry-run > myng2.yaml

cat <<EOT > nvme.yaml
  preBootstrapCommands:
    - |
      # Install Tools
      yum install nvme-cli links tree jq tcpdump sysstat -y

      # Filesystem & Mount
      mkfs -t xfs /dev/nvme1n1
      mkdir /data
      mount /dev/nvme1n1 /data

      # Get disk UUID
      uuid=\$(blkid -o value -s UUID mount /dev/nvme1n1 /data)

      # Mount the disk during a reboot
      echo /dev/nvme1n1 /data xfs defaults,noatime 0 2 >> /etc/fstab
EOT
sed -i -n -e '/volumeType/r nvme.yaml' -e '1,$p' myng2.yaml
eksctl create nodegroup -f myng2.yaml

# 노드 보안그룹 ID 확인
NG2SGID=$(aws ec2 describe-security-groups --filters Name=group-name,Values=*ng2* --query "SecurityGroups[*].[GroupId]" --output text)
aws ec2 authorize-security-group-ingress --group-id $NG2SGID --protocol '-1' --cidr 192.168.1.100/32

# 워커 노드 SSH 접속
N4=<각자 자신의 워커 노드4번 Private IP 지정>
N4=192.168.3.160
ssh ec2-user@$N4 hostname

# 확인
ssh ec2-user@$N4 sudo nvme list
ssh ec2-user@$N4 sudo lsblk -e 7 -d
ssh ec2-user@$N4 sudo df -hT -t xfs
ssh ec2-user@$N4 sudo tree /data
ssh ec2-user@$N4 sudo cat /etc/fstab

# (옵션) max-pod 확인
kubectl describe node -l disk=nvme | grep Allocatable: -A7
Allocatable:
  attachable-volumes-aws-ebs:  25
  cpu:                         1930m
  ephemeral-storage:           27905944324
  hugepages-1Gi:               0
  hugepages-2Mi:               0
  memory:                      3097552Ki
  pods:                        100

# (옵션) kubelet 데몬 파라미터 확인 : --max-pods=29 --max-pods=100
ssh ec2-user@$N4 sudo ps -ef | grep kubelet
root      2972     1  0 16:03 ?        00:00:09 /usr/bin/kubelet --config /etc/kubernetes/kubelet/kubelet-config.json --kubeconfig /var/lib/kubelet/kubeconfig --container-runtime-endpoint unix:///run/containerd/containerd.sock --image-credential-provider-config /etc/eks/image-credential-provider/config.json --image-credential-provider-bin-dir /etc/eks/image-credential-provider --node-ip=192.168.3.131 --pod-infra-container-image=602401143452.dkr.ecr.ap-northeast-2.amazonaws.com/eks/pause:3.5 --v=2 --cloud-provider=aws --container-runtime=remote --node-labels=eks.amazonaws.com/sourceLaunchTemplateVersion=1,alpha.eksctl.io/cluster-name=myeks,alpha.eksctl.io/nodegroup-name=ng2,disk=nvme,eks.amazonaws.com/nodegroup-image=ami-0da378ed846e950a4,eks.amazonaws.com/capacityType=ON_DEMAND,eks.amazonaws.com/nodegroup=ng2,eks.amazonaws.com/sourceLaunchTemplateId=lt-030e6043923ce712b --max-pods=29 --max-pods=100
# 기존 삭제
#curl -s -O https://raw.githubusercontent.com/rancher/local-path-provisioner/master/deploy/local-path-storage.yaml
cd
kubectl delete -f local-path-storage.yaml

#
sed -i 's/opt/data/g' local-path-storage.yaml
kubectl apply -f local-path-storage.yaml

# 모니터링
watch 'kubectl get pod -owide;echo;kubectl get pv,pvc'
ssh ec2-user@$N4 iostat -xmdz 1 -p nvme1n1

# 측정 : Read
#curl -s -O https://raw.githubusercontent.com/wikibook/kubepractice/main/ch10/fio-read.fio
kubestr fio -f fio-read.fio -s local-path --size 10G --nodeselector disk=nvme
...


#
kubectl delete -f local-path-storage.yaml

# 노드그룹 삭제
eksctl delete nodegroup -c $CLUSTER_NAME -n ng2
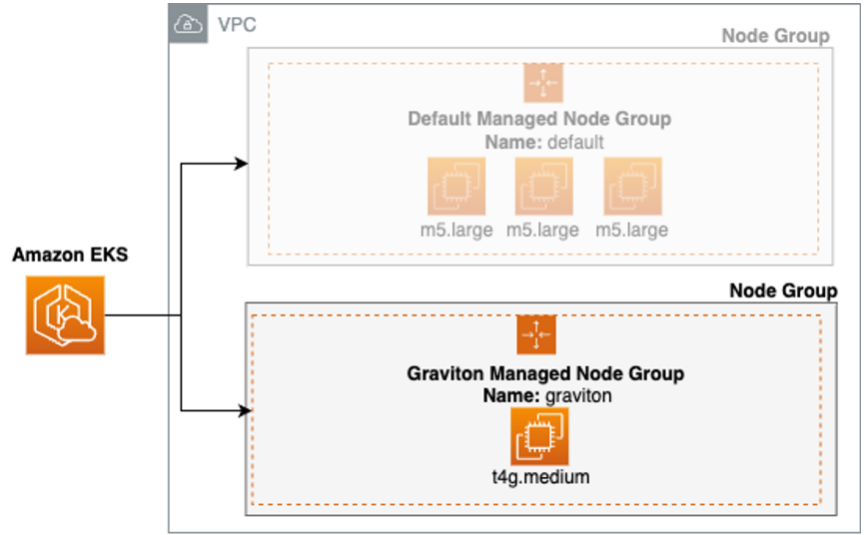
- Graviton (ARM) Instance 노드그룹

#
kubectl get nodes -L kubernetes.io/arch

# 신규 노드 그룹 생성
eksctl create nodegroup --help
eksctl create nodegroup -c $CLUSTER_NAME -r $AWS_DEFAULT_REGION --subnet-ids "$PubSubnet1","$PubSubnet2","$PubSubnet3" --ssh-access \
  -n ng3 -t t4g.medium -N 1 -m 1 -M 1 --node-volume-size=30 --node-labels family=graviton --dry-run > myng3.yaml
eksctl create nodegroup -f myng3.yaml

# 확인
kubectl get nodes --label-columns eks.amazonaws.com/nodegroup,kubernetes.io/arch
kubectl describe nodes --selector family=graviton
aws eks describe-nodegroup --cluster-name $CLUSTER_NAME --nodegroup-name ng3 | jq .nodegroup.taints

# taints 셋팅 -> 적용에 2~3분 정도 시간 소요
aws eks update-nodegroup-config --cluster-name $CLUSTER_NAME --nodegroup-name ng3 --taints "addOrUpdateTaints=[{key=frontend, value=true, effect=NO_EXECUTE}]"

# 확인
kubectl describe nodes --selector family=graviton | grep Taints
aws eks describe-nodegroup --cluster-name $CLUSTER_NAME --nodegroup-name ng3 | jq .nodegroup.taints
# NO_SCHEDULE - This corresponds to the Kubernetes NoSchedule taint effect. This configures the managed node group with a taint that repels all pods that don't have a matching toleration. All running pods are not evicted from the manage node group's nodes.
# NO_EXECUTE - This corresponds to the Kubernetes NoExecute taint effect. Allows nodes configured with this taint to not only repel newly scheduled pods but also evicts any running pods without a matching toleration.
# PREFER_NO_SCHEDULE - This corresponds to the Kubernetes PreferNoSchedule taint effect. If possible, EKS avoids scheduling Pods that do not tolerate this taint onto the node.
#
cat << EOT > busybox.yaml
apiVersion: v1
kind: Pod
metadata:
  name: busybox
spec:
  terminationGracePeriodSeconds: 3
  containers:
  - name: busybox
    image: busybox
    command:
    - "/bin/sh"
    - "-c"
    - "while true; do date >> /home/pod-out.txt; cd /home; sync; sync; sleep 10; done"
  tolerations:
    - effect: NoExecute
      key: frontend
      operator: Exists
EOT
kubectl apply -f busybox.yaml

# 파드가 배포된 노드 정보 확인
kubectl get pod -owide

# 삭제
kubectl delete pod busybox
eksctl delete nodegroup -c $CLUSTER_NAME -n ng3'AEWS Study' 카테고리의 다른 글
| 5주차 - EKS Autoscaling - (Node Autoscaling) (0) | 2024.04.05 |
|---|---|
| 5주차 - EKS Autoscaling - (Pod Autoscaling) (0) | 2024.04.05 |
| 4주차 - EKS Observability (0) | 2024.03.31 |
| 2주차 - EKS Networking (0) | 2024.03.16 |
| 1주차 - Amzaon EKS 설치 및 기본 사용 (0) | 2024.03.10 |