

728x90
IaC란
- Infrastructure as a Code로 코드를 작성하여 인프라를 구성하는것을 의미
- ex: 퍼블릭 클라우드의 경우, 직접 콘솔에 접속하여 VPC 생성 / Subnet 생성 / SG생성 / Instance 생성을 진행하지만 IaC를 사용하면 코드를 이용하여 콘솔에 접속하지 않고 간단하게 인프라 구성 및 클라우드 자원을 생성 할 수 있음
Terraform이란

- 하시코프사에서 공개한 IaC(Infrastructure as a Code) 도구로, 현재 IaC 도구로 가장 널리 사용되고 있는 플랫폼
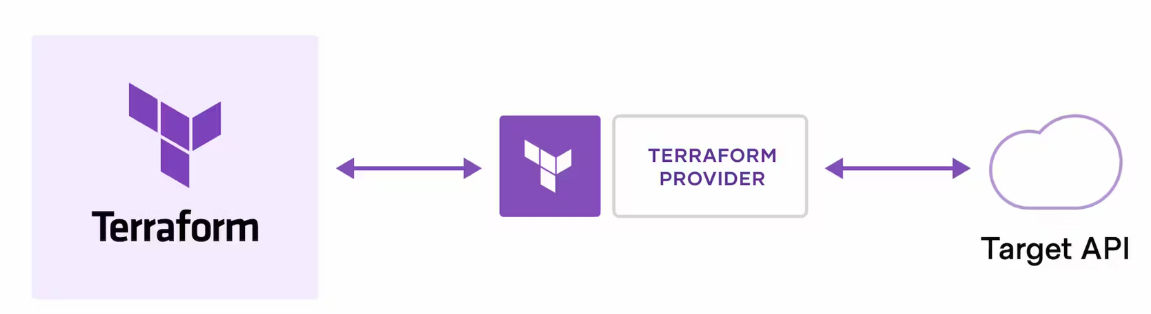
- 다양한 Provider를 제공하여 테라폼 문법 하나로 다양한 클라우드 인프라 및 리소스를 생성
- Provider를 통해 각 Target에 API를 호출하여 리소스를 생성하기 때문에 속도가 매우 빠름
실습 환경 준비 / Terraform 설치
- 윈도우 Desktop를 사용하는 경우 WSL2 리눅스 환경 세팅 / VSCODE 연동
- terraform 설치
- awscli 설치
- 기타 실습에 편리한 툴
- tree
- jq
WSL2 설치 및 구성
# Windows wsl2 설치
# 자신의 windows 업데이트 버전을 확인하여 wsl설치가 가능한지 확인 필요

1. wsl2 설치 #CMD창을 관리자 권한으로 실행
wsl --install #wsl 설치
wsl --set-default-version 2 # wsl 버전 기본값을 2로 변경

2. 마이크로소프트 스토에서에서 설치하고 싶은 리눅스 배포반 검색 및 설치

3. ubuntu 22.04 설치
설치 클릭하면 자동으로 앱이 실행되면서 터미털이 열리고 설치 진행
만약 터미널이 자동으로 열리지 않는다면 PC 재부팅 후 진행

4. 초기 사용자 계정 / 패스워드 설정

5. 설치 확인 # cmd에서 확인
wsl -l -v
C:\Users\Burst>wsl -l -v
  NAME            STATE           VERSION
* Ubuntu          Running         2
  Ubuntu-22.04    Stopped         2
Terraform 및 기타 Tool 설치
# 1. Terraform 설치

wget -O- https://apt.releases.hashicorp.com/gpg | sudo gpg --dearmor -o /usr/share/keyrings/hashicorp-archive-keyring.gpg
echo "deb [signed-by=/usr/share/keyrings/hashicorp-archive-keyring.gpg] https://apt.releases.hashicorp.com $(lsb_release -cs) main" | sudo tee /etc/apt/sources.list.d/hashicorp.list
sudo apt update && sudo apt install terraform

# 테라폼 버전 정보 확인
terraform version

# 2. awscli2 설치
curl "https://awscli.amazonaws.com/awscli-exe-linux-x86_64.zip" -o "awscliv2.zip"
unzip awscliv2.zip
sudo ./aws/install

# 3. 자격증명 진행
aws configure


# 4. 실습에 편리한 툴 설치
apt install -y tree jq
vscode 설정 및 추가 확장 팩 설치
- HashiCorp HCL : HCL 파일에 대한 문법 하이라이팅 기능 제공
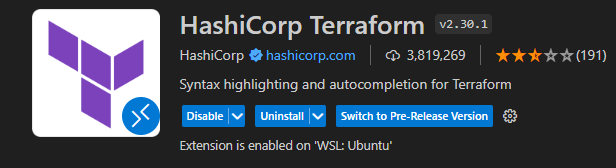
- HashiCorp Terraform : 테라폼에 대한 문법 하이라이팅 기능 제공

- vscode에서 wsl 연동 / vscode 터미널에서 리눅스 명령어 작업 및 해당 디렉토리 내 파일 편집

주요 명령어 & 순서
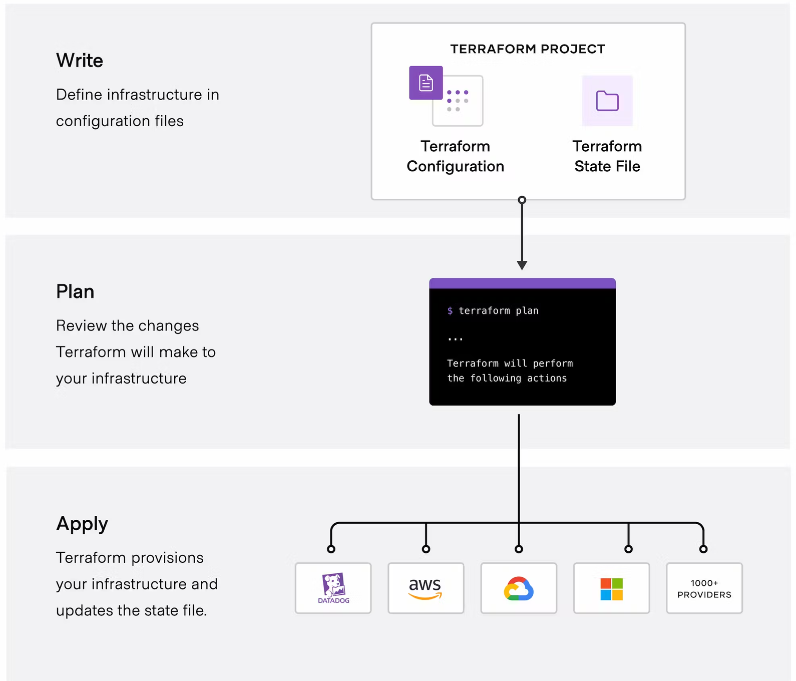
- 테라폼 코드 작성 후 실행 순서는 init - plan - apply 순으로 실행
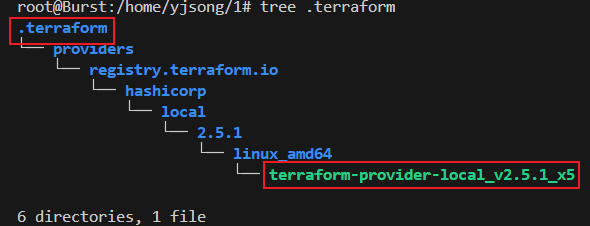
- init
- 테라폼 초기화 명령어
- terraform init 입력 시 .terraform디렉토리가 생성되며 해당 디렉토리 내 provider 관련 프러그인 다운
resource "local_file" "abc" {
content  = "abc!"
filename = "${path.module}/abc.txt"
}- validate
- 테라폼 구성 파일 유효성 확인 명령어
- API 작업이 발생하는 plan 명령어와 달리 작성된 구성의 문법, 종속성, 속성 이름이나 연결된 값의 정확성 확인을 수행
- plan
- terraform plan 명령은 테라폼으로 적용할 인프라의 변경 사항에 관한 실행 계획을 생성
- 출력되는 결과를 확인하여 어떤 변경이 적용될지 사용자가 미리 검토하고 이해하는데 도움을 줌
- 변경 사항을 실제로 적용하지는 않으므로, 적용 전에 예상한 구성이 맞는지 검토
Terraform used the selected providers to generate the following execution plan. Resource actions are indicated with the following symbols:
  + create

Terraform will perform the following actions:

  # local_file.abc will be created
  + resource "local_file" "abc" {
      + content              = "abc!"
      + content_base64sha256 = (known after apply)
      + content_base64sha512 = (known after apply)
      + content_md5          = (known after apply)
      + content_sha1         = (known after apply)
      + content_sha256       = (known after apply)
      + content_sha512       = (known after apply)
      + directory_permission = "0777"
      + file_permission      = "0777"
      + filename             = "./abc.txt"
      + id                   = (known after apply)
    }

Plan: 1 to add, 0 to change, 0 to destroy.
- apply
- terraform apply 는 plan 계획을 기반으로 작업을 실행
- plan으로 생성되는 파일을 통하여 apply 명령어 수행
- -auto-approve 시 yes를 별도로 입력하지 않아도 됨
- replace 옵션: 프로비저닝 완료 후 특정 리소스만 삭제 후 다시 생성(play, apply 모두 적용 가능)
- terraform apply 는 plan 계획을 기반으로 작업을 실행
# apply 실행 : no 입력
terraform apply
...
Enter a value: no
...

# plan 결과를 지정된 파일(바이너리 형태) 이름으로 생성
terraform plan -out=tfplan
cat tfplan
file tfplan

# apply 실행 : 실행계획이 있으므로 즉시 적용됨
terraform apply tfplan
ls -al abc.txt

# mian.tf파일 내용 추가후 apply

resource "local_file" "abc" {
content = "abc!"
filename = "${path.module}/abc.txt"
}

resource "local_file" "dev" {
  content  = "def!"
  filename = "${path.module}/def.txt"
}

# apply 실행 : 추가된 local_file dev만 생성
# 테라폼은 선언적 구성 관리를 제공하는 언어로 멱등성 idempotence을 갖고,
  상태를 관리하기 때문에 동일한 구성에 대해서는 다시 실행하거나 변경하는 작업을 수행하지 않음

terraform state list
root@Burst:/home/yjsong/t101# terraform state list
local_file.abc
local_file.dev

ls -al
-rwxr-xr-x  1 root   root      4 Jun 16 08:07 abc.txt
-rwxr-xr-x  1 root   root      4 Jun 16 08:15 def.txt

terraform apply -replace=local_file.abc -auto-approve

# abc.txt의 파일 생성 시간이 변경된 것을 확인
ls -al
-rwxr-xr-x  1 root   root      4 Jun 16 08:24 abc.txt
-rwxr-xr-x  1 root   root      4 Jun 16 08:15 def.txt
- destory
- 테라폼 코드를 실행하여 생성된 자원 삭제 명령어
- -auto-approve 시 yes를 별도로 입력하지 않아도 됨
root@Burst:/home/yjsong/t101# terraform destroy
local_file.abc: Refreshing state... [id=5678fb68a642f3c6c8004c1bdc21e7142087287b]
local_file.dev: Refreshing state... [id=15f946cb27f0730866cefea4f0923248d9366cb0]

Terraform used the selected providers to generate the following execution plan. Resource actions are indicated with the following symbols:
  - destroy

Terraform will perform the following actions:

  # local_file.abc will be destroyed
  - resource "local_file" "abc" {
      - content              = "abc!" -> null
      - content_base64sha256 = "U+Dv8yBGJvPiVspjZXLXzN+OtaGQyd76P6VnvGOGa3Y=" -> null
      - content_base64sha512 = "J873Ugx5HyDEnYsjdX8iMBjn4I3gft82udsl3lNeWEoqwmNE3mvUZNNz4QRqQ3iaT5SW1y9p3e1Xn2txEBapKg==" -> null
      - content_md5          = "4edb03f55c86d5e0a76f5627fa506bbf" -> null
      - content_sha1         = "5678fb68a642f3c6c8004c1bdc21e7142087287b" -> null
      - content_sha256       = "53e0eff3204626f3e256ca636572d7ccdf8eb5a190c9defa3fa567bc63866b76" -> null
      - content_sha512       = "27cef7520c791f20c49d8b23757f223018e7e08de07edf36b9db25de535e584a2ac26344de6bd464d373e1046a43789a4f9496d72f69dded579f6b711016a92a" -> null
      - directory_permission = "0777" -> null
      - file_permission      = "0777" -> null
      - filename             = "./abc.txt" -> null
      - id                   = "5678fb68a642f3c6c8004c1bdc21e7142087287b" -> null
    }

  # local_file.dev will be destroyed
  - resource "local_file" "dev" {
      - content              = "def!" -> null
      - content_base64sha256 = "Rm4skjSqJGFRkUFCflW7rNUZ4sAS3vzjWfrOjTwlDBU=" -> null
      - content_base64sha512 = "JwN8zsR7XvAQZ9KkxokoJPkPZt5LElyjPuH0Pmhd82GIL/Zu3rZOHRacv8myxhbbZzpUahtQ6HDB0OMSiXedyA==" -> null
      - content_md5          = "3f6d9022e2f7b9cf3995155f239cba7c" -> null
      - content_sha1         = "15f946cb27f0730866cefea4f0923248d9366cb0" -> null
      - content_sha256       = "466e2c9234aa2461519141427e55bbacd519e2c012defce359face8d3c250c15" -> null
      - content_sha512       = "27037ccec47b5ef01067d2a4c6892824f90f66de4b125ca33ee1f43e685df361882ff66edeb64e1d169cbfc9b2c616db673a546a1b50e870c1d0e31289779dc8" -> null
      - directory_permission = "0777" -> null
      - file_permission      = "0777" -> null
      - filename             = "./def.txt" -> null
      - id                   = "15f946cb27f0730866cefea4f0923248d9366cb0" -> null
    }

Plan: 0 to add, 0 to change, 2 to destroy.

Do you really want to destroy all resources?
  Terraform will destroy all your managed infrastructure, as shown above.
  There is no undo. Only 'yes' will be accepted to confirm.

  Enter a value: yes

local_file.abc: Destroying... [id=5678fb68a642f3c6c8004c1bdc21e7142087287b]
local_file.dev: Destroying... [id=15f946cb27f0730866cefea4f0923248d9366cb0]
local_file.abc: Destruction complete after 0s
local_file.dev: Destruction complete after 0s

Destroy complete! Resources: 2 destroyed.
root@Burst:/home/yjsong/t101# terraform state list
root@Burst:/home/yjsong/t101#- fmt
- format 또는 reformat 줄임 표시로 terraform tmt 명령어로 수행, 테라폼 구성 파일을 표준 형식과 표준 스타일로 적용. 코드 가독성 높임
- state
- 테라폼으로 실행 후, 워크스페이스에 상태를 확인
- 서브 명령어로 list, show, mv, pull, push, rm, replace-provider가 있음
실습 / EC2 1대 배포 & 웹 서버 설정
1. ec2에 사용할 최신 AMI ID 확인
# Ubuntu 22.04 최신 AMI ID 확인
aws ec2 describe-images --owners 099720109477 \
    --filters "Name=name,Values=ubuntu/images/hvm-ssd/ubuntu-jammy-22.04-amd64-server-*" "Name=state,Values=available" \
    --query 'Images|sort_by(@, &CreationDate)[-1].[ImageId, Name]' --output text

# 변수 지정
UBUNTUID=ami-0bcdae8006538619a

root@Burst:/home/yjsong/t101/t101-1week-web# echo $UBUNTUID
ami-0bcdae8006538619a
2. 코드 작성 (user_data)에 EC2생성 시 실행 명령어 작성
cat <<EOT > main.tf
provider "aws" {
  region = "ap-northeast-2"
}

resource "aws_instance" "example" {
  ami                    = "$UBUNTUID"
  instance_type          = "t2.micro"

  user_data = <<-EOF
              #!/bin/bash
              echo "Hello, T101 Study" > index.html
              nohup busybox httpd -f -p 8080 &
              EOF

  tags = {
    Name = "terraform-Study-101"
  }
}
EOT
3. 배포 실행
root@Burst:/home/yjsong/t101/t101-1week-web# terraform init

Initializing the backend...

Initializing provider plugins...
- Finding latest version of hashicorp/aws...
- Installing hashicorp/aws v5.54.1...
- Installed hashicorp/aws v5.54.1 (signed by HashiCorp)

Terraform has created a lock file .terraform.lock.hcl to record the provider
selections it made above. Include this file in your version control repository
so that Terraform can guarantee to make the same selections by default when
you run "terraform init" in the future.

Terraform has been successfully initialized!

You may now begin working with Terraform. Try running "terraform plan" to see
any changes that are required for your infrastructure. All Terraform commands
should now work.

If you ever set or change modules or backend configuration for Terraform,
rerun this command to reinitialize your working directory. If you forget, other
commands will detect it and remind you to do so if necessary.

root@Burst:/home/yjsong/t101/t101-1week-web# terraform plan

Terraform used the selected providers to generate the following execution plan. Resource actions are indicated with the following symbols:
  + create

Terraform will perform the following actions:

  # aws_instance.example will be created
  + resource "aws_instance" "example" {
                                  .
                                  .
                                  .

      + user_data                            = "d91ca31904077f0b641b5dd5a783401396ffbf3f"
      + user_data_base64                     = (known after apply)
      + user_data_replace_on_change          = false
      + vpc_security_group_ids               = (known after apply)
    }

Plan: 1 to add, 0 to change, 0 to destroy.

──────────────────────────────────────────────────────────────────────────────────────────────────────────────────────────────────────────────────────────────────────────

Note: You didn't use the -out option to save this plan, so Terraform can't guarantee to take exactly these actions if you run "terraform apply" now.

root@Burst:/home/yjsong/t101/t101-1week-web# terraform apply -auto-approve

Terraform used the selected providers to generate the following execution plan. Resource actions are indicated with the following symbols:
  + create

Terraform will perform the following actions:

  # aws_instance.example will be created
  + resource "aws_instance" "example" {
      + ami                                  = "ami-0bcdae8006538619a"
                                 .
                                 .
                                 .
      + instance_type                        = "t2.micro"
                                 .
                                 .
      + source_dest_check                    = true
      + spot_instance_request_id             = (known after apply)
      + subnet_id                            = (known after apply)
      + tags                                 = {
          + "Name" = "terraform-Study-101"
        }
      + tags_all                             = {
          + "Name" = "terraform-Study-101"
        }
      + tenancy                              = (known after apply)
      + user_data                            = "d91ca31904077f0b641b5dd5a783401396ffbf3f"
      + user_data_base64                     = (known after apply)
      + user_data_replace_on_change          = false
      + vpc_security_group_ids               = (known after apply)
    }

Plan: 1 to add, 0 to change, 0 to destroy.
aws_instance.example: Creating...
aws_instance.example: Still creating... [10s elapsed]
aws_instance.example: Still creating... [20s elapsed]
aws_instance.example: Still creating... [30s elapsed]
aws_instance.example: Creation complete after 32s [id=i-09bed39b9e7ed74a0]

Apply complete! Resources: 1 added, 0 changed, 0 destroyed.
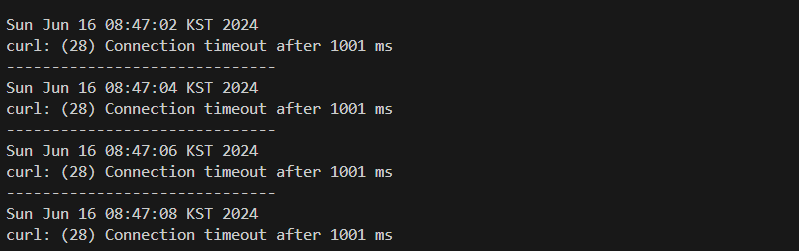
- ec2 배포 시 sg설정이 되어 있지 않아 웹서버 접근 실패

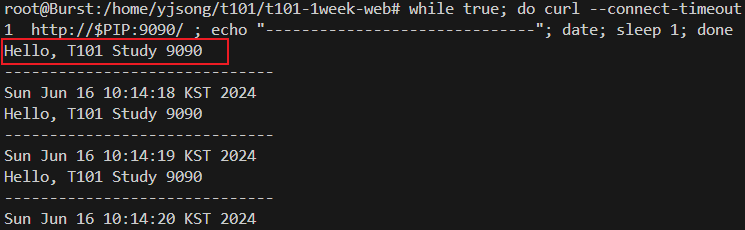
3. 보안그룹 생성 후 연동
cat <<EOT > main.tf
provider "aws" {
  region = "ap-northeast-2"
}

resource "aws_instance" "example" {
  ami                    = "$UBUNTUID"
  instance_type          = "t2.micro"
  vpc_security_group_ids = [aws_security_group.instance.id]

  user_data = <<-EOF
              #!/bin/bash
              echo "Hello, T101 Study" > index.html
              nohup busybox httpd -f -p 8080 &
              EOF

  tags = {
    Name = "Single-WebSrv"
  }
}

resource "aws_security_group" "instance" {
  name = var.security_group_name

  ingress {
    from_port   = 8080
    to_port     = 8080
    protocol    = "tcp"
    cidr_blocks = ["0.0.0.0/0"]
  }
}

variable "security_group_name" {
  description = "The name of the security group"
  type        = string
  default     = "terraform-example-instance"
}

output "public_ip" {
  value       = aws_instance.example.public_ip
  description = "The public IP of the Instance"
}
EOT

728x90
'T101' 카테고리의 다른 글
| 1주차 - Terraform 기본 사용법 (3/3) (1) | 2024.06.16 |
|---|---|
| 1주차 - Terraform 기본 사용법 (2/3) (0) | 2024.06.16 |